I hope you’re having a good year so far and that your resolution is going strong. My resolution was to work on learning to be proud of myself again and stop focusing on what I lost or am unable to do after I became disabled. Part of that is to do little things to help me feel productive and proving that I CAN still do some things.
In light of my goals I wanted to try some of the many crafty pins I have from Pinterest. I might give them as gifts or keep for us to use, but mostly it was to prove to myself that I actually can be crafty. *laugh* I’ve never thought I could be, although I’ve always done some artistic things. When I saw a pin my stepmother had posted on Facebook about using crayons to create pretty swirled ornaments I thought it sounded like the perfect craft to try.
I had taken a screenshot of her post, which said to melt some crayons inside clear glass ornaments with your hair dryer, so I hit the day after Christmas sale at Walmart and picked up a package of them for around a dollar. That way I wouldn’t be out much if I had one of those days of disasters I tend to stumble upon. *grin* I had everything else on hand, so once I found some gumption I went for it.
Now, I went through lots of pins on Pinterest to find a good tutorial and I never found one. The instructions about were just about it and I’m not going to send you to a site for that. I also think a tutorial that says what not to try could save others a lot of time and frustration, so I’m going to provide it.
First off, make sure you get actual glass ornaments and not the plastic ones that several stores sell that look a lot like the real deal. I promise you that the plastic will distort with the intense heat of the blow dryer. *shaking head with embarrassment* However, if you want to make some creatively shaped ornaments, that would be an easy way to go about it and would be totally unique. *grin* Decorate as you want and voila, an original creation. For this though, make sure it’s the real deal. Second, don’t use a knock off brand. After sacrificing a box of off brand crayons to my xacto knife I discovered that they are incredibly hard to melt. Get a box of Crayola that you can slaughter.
Now I tried a variety of lengths and I found that half an inch chunks worked the best for me. You can cut smaller pieces for extra detail swirls, but they don’t last long, and lengths beyond half an inch tend to stick for a few, which makes bare spots when they do that. (More about that later. Once you’ve cut your chunks on something disposable like old sale ads or something, clean up so that there’s nothing lightweight in your work space. The dryer WILL blow everything off if you don’t have a clear workspace.)
Pop the cap off your ornament and drop in one or two pieces of crayon. I found that two colors at once made some gorgeous designs and made the process a lot faster, although you have to try to keep the two pieces together as you are melting them, since you have to chase the crayon piece(s) with the hair dryer. Before you start the dryer put the cap back on. Trust me on this. When you get going the dryer will blow just right into the hole sometimes and cause a seriously annoying noise. While you’re putting stuff in the bulb you can use a mason jar lid to keep it from rolling around. If you get creative with your add-ins, this can save you a big mess (trust me).
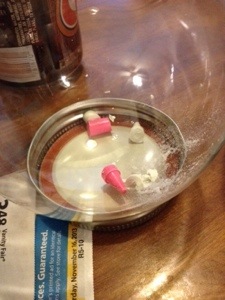
I learned that if you get really creative and add glitter, and that bulb decides to roll, since the top area is heavier, well, those crayons will knock a healthy portion of glitter all over your table. I also happen to know that manly men hate to have glitter accidentally sticking to their things when they go to work, so this little oops has the potential of causing you a bad day. *grin*
The easiest way to get the ball rolling once you’re all ready is to hold the ornament by the top and put the blow dryer at the underside, directly on the crayon(s) and give it a minute or two to start to melt, with the dryer on your highest settings (mine allows for hot heat and high force – warm doesn’t cut it for this project). You’ll start to see a little pool around the edges and it’s much easier to get going once it’s at this stage. (I forgot to get a picture at that point, but I did when I switched colors, so at least you can get the idea.)
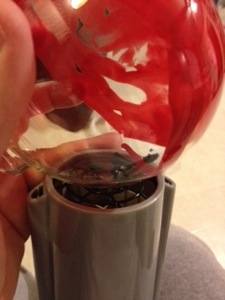
Once the crayon starts to melt a little just start to roll the ornament slowly, following closely with the hair dryer to keep it melting, and swirl to your heart’s content. I found it was much easier to control the process by putting the ornament down on a hot pad on my knee and rotating the ornament while keeping the dryer steady. That glass can get really hot and your leg can get burned if you have the blow dryer focused toward it for the half hour or so this takes. Please put something down to protect yourself. I tried the mason jar lid, too, but that didn’t work so well. The pad on the knee worked the best.
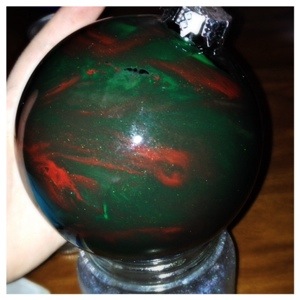
Anyway, you will probably have to add more pieces and start the process over if you want as much of the ornament covered as possible. As you will see later I covered as much as I could, but I saw some pins where people just did a few swirls with the melted crayon and had lots of clear ornament showing. The more colors you have and the hotter the overall ornament gets, the more the colors will blend. If you melt colors individually it’s a bit more work, but you get distinct swirls. As mentioned before when a chunk of crayon stops in an all ready colored area the chunk will strip the previous color off and you’ll have a clear spot again. I found that if I kept the chunk there and focused the dryer on it, much like I did to get the whole prices started, and got a little pool of melted color going, then I could swish the chunk around and re color most of the stripped area. No matter how hard I tried every ornament had a few stripped spots. Hey, it’s handmade, so that just shows that a machine didn’t do it. *smile* Toward the end you will have trouble knowing where the crayon is, so you’ll have to pull the cap off and shine a light inside to see where it is. The lighter the colors the easier this is and the last bulb I did was so light that I could just hold it up before a light to see where to focus the dryer.
If you decide to add glitter don’t add a lot of it before you get the crayons started. The glitter coats the chunks and makes it hard for them to melt at the beginning. Get your little pool started and then sprinkle some in. You can also blow the dryer into the opening for a few seconds, sprinkle the glitter in, and then shake the ornament to get the glitter to settle everywhere. Doing the heat inside will make your colors blend a lot more. Just sprinkling in some glitter throughout the process worked the best for me. I used extremely fine, cosmetic safe, glitter that I have on hand, so you may have different results with a bigger and heavier glitter. The only time mine clumped was when I added it to the cold crayons.
One last note – the darker your colors the harder it is to photograph. *laugh* I ended up with one red and green swirled ornament, a second one using the same two colors but more blended, so it looks kind of like camo (hmm, sounds like a great stocking stuffer for my favorite redneck), and then a really pretty light one, where I used pink, white, peach, and iridescent glitter. You have to look hard to see the glitter in the picture, but it has a gorgeous soft (almost gold) shimmer in person. I had one shatter while I was working too, which was another light one, and after some looking I found that there were some fine cracks in the ornament and when I dropped the piece of crayon in I hit one. I found a weak spot in the other light one too, before I started, and made sure to softly slide the pieces in and I kept the dryer at an angle to keep from having direct force on the ornament.
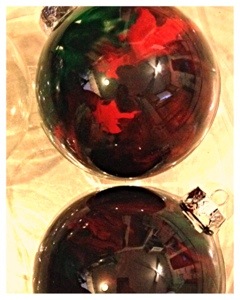
All in all I spent probably two hours working on the four ornaments, which included the time it took to learn that the off brand crayons wouldn’t work and chopping up some Crayolas, so it’s not a really time consuming project. Your fingertips can get a little toasty, but it’s a pretty safe craft, other than the projectile chunks of crayon as you cut them. *laugh* Depending on how the light hits your ornament they can look completely different from one moment to the next, too! The best part, in my opinion, is that the possibilities are endless. Hopefully you’ll give this project a try. If you do, I’d love for you to post the link so I can see your incredible results. In the meantime, here are some final result pictures.
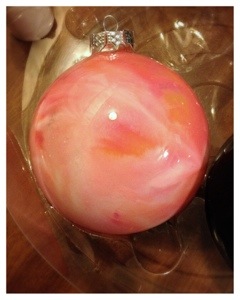
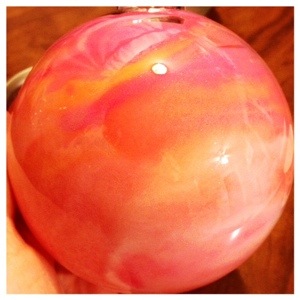
The light one is definitely my favorite. I plan to try some other color combinations too, but don’t know that I’ll ever top that. *grin* Anyway, I hope you don’t mind my going off topic today and being rather lengthy. Happy pampering and stay warm to those of you “enjoying” the wintery weather if you’re getting hit too. 🙂
