While I’m waiting for a soft set on my soap project I thought I’d pop on for a moment. With the weather getting nicer the plants are starting to green up and seeing some vines today reminded me of an easy tip from a PA for Poison Ivy prevention. Until I got married I never paid attention to the “poison” group. Amazingly enough it’s one of the few things that doesn’t affect me (yet), but Larry became really allergic once he hit 35. After getting steroids a few times the PA asked if he had been washing with Dawn Dish Soap after working outside. This caused us both to raise our eyebrows. *grin* She said that replacing your body wash with Dawn (especially orange, but we have experimented with others to test that part) will help strip the oils from your skin, which seriously reduces, if not eliminates, your chances of breaking out. So it may seem a little odd to people when they stay over, open the shower curtain, and among a ton of tester items they find a big bottle of Dawn on the shelf, but he hasn’t had another steroid shot for five years. There have been small break outs, but usually because he was out so long before he showered. Anyway, I wanted to share in case anyone else out there didn’t know this handy tip, but now I need to go whip some soap into submission (okay, okay, into a froth, but that sounded better *grin*).
Author Archives: Georgia's Pampering
Honey Cleanser DIY
As I’ve said before I think honey is an amazing ingredient that has tons of awesome benefits, not just making a biscuit delectable. *smile* I have made a few variations of the “Honey Bear Cleanser” in the Ecobeauty book, by Lauren Cox. It’s actually what inspired me to start using honey in a facial soap (Acne Bee Gone Soap). I want to share this incredibly easy recipe with my favorite variation since I’m not feeling well enough to work on my projects.
“1/4 cup of honey
1/4 cup of water
2 tablespoons of liquid soap
Gently stir all of the ingredients together, being careful not to beat the mixture, as this will cause it to foam up. Pour the cleanser into a clean plastic honey near container or a container with a pour spout or pump. To use, pour a small amount in the palm of your hand, then massage it gently into your skin or even your hair. Rinse thoroughly with warm water, then pat dry.”
I’ve never claimed that I’ve made the perfect product for my face and doubt I ever will, honestly. I figure the big wigs with the labs have a better chance at that, especially when my illness makes things kind of complicated. So I use my favorite-for-the-moment facial cleanser in place of the liquid soap. When things really go wrong and I start breaking out on my face I even dab a dot of honey on the spot (after the night ritual), and usually when I rinse in the morning it’s at least a little bit better. Or I switch to my honey soap for a few days, sometimes.
Any way you look at it honey is amazing. Try adding a little to your favorite cleansers or “a dab will do you” when needed. *gestures for you to come in close and then whispers* I’ve even added it to my bath water when I’m having a lot of trouble with my skin. If your honey is a little too thick, it’s not bad. Just give the closed container a warm water bath (mine always tips – i hope you have better luck lol) and the crystals should turn back. It still works though, so I just take a butter knife and scoop some out. Local honey tends to crystallize a little faster in my pantry than commercial stuff, so I learned to not freak out over the crystals. *grin*
Hope this quick and easy recipe, plus the variation and tips, help you. Sometimes I feel like a folk doctor from olden times. “You have a boil? Ouch! Have you tried a little honey on it while letting the spot air out?” 😉
My Monster
I’ve been working on figuring out a monster to use for the marketing picture for Monsters Away Spray. I have spoken to a few moms, a few kids, and last night I even ran a few ideas by an artist. Almost all of us agree that it should be colorful and kind of fun, so the picture isn’t scary to kids. (The boy that I asked said there needed to be robots, but I’m not about to go there…*imagining a bunch of smoke when liquid gets to the electronics or the cardboard getting icky if we made a fake robot*. Yeah, I’m dangerous enough just walking across a room. Let’s not add situational dangers. *cracking up*)
Anyway, I honestly don’t want to buy a stuffed animal or creature. Last night I eyed my troop of stuffed animals up in the canopy (hey, lots of sweet memories, so I couldn’t just toss them once I became an adult. Comes in handy when kids are over, too, and in a hanging canopy they’re out of the way. *smile*). I have a small dragon, a massive dog, and a nice sized bear that could all work with a little creativity. I could attach all manner of things! And then I decided to see what ideas Pinterest had for this project.
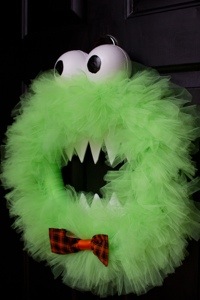 I’m seriously thinking of making a version of this guy. I wouldn’t have to deface a childhood memory or something that Larry won for me when we were dating (wow, was that really almost half of my life ago??). If I do this I will put wiggly eyes all over, but especially a set on the top, so if it’s “haunting” under the bed it’ll look like it’s still looking at the kid when they peek under there and spray it. Plus it’s sturdy and bright enough to just hang out in the closet for that version of the shot. It’ll be fun to bring it out to decorate with afterward, too.
I admit that it’s really hard to go soft on the scariness. I love blood and gore. (Weird thing is I get squeamish watching someone put contacts in though. Love to watch botfly extractions and look at medical journals full of wounds, but seeing someone in person put contacts in or even remove a splinter…I scream like the girl in The Ring is after me. Rofl.) It’s so hard to not think of dripping blood (I actually have a theatrical blood kit in my cabinet *trying to whistle innocently*), jagged fangs, crusty boils, and a body part snagged in the teeth. *happy sigh* So I get extra credit for trying to keep this on the adorable side. *grin*
A little background note – we’re coming up on our tenth anniversary and have discussed a party (although this was originally thought up for the fifth, then agreed to reconsider at ten). Although it’s in June we would have a total costume, blood, gore, and black lights kind of event. When we had been planning our wedding one idea we had considered was Frankenstein and The Bride Of, then our wedding party would be other monsters. At the time there were too many itty bitty kids and we were worried that we’d scare them, so it got set aside, and then Larry won the debate for a traditional wedding. When we thought of the anniversary party we found some Halloween and movie prop supply stores that have some awesome dismemberments, packaged body parts, and what not. The person being electrocuted is out of our budget though, sadly. *laugh* A severed hand holding the knife for the vegetable spread on the buffet, a coffin that people can get into and take pictures in, and even a box of miscellaneous costume pieces in the bathroom in case someone wants or needs to get more into the theme…
Now you get why “cute” is so hard for me. *grin* Any input on which kind of monster you think would look good for the marketing?
I’m in love
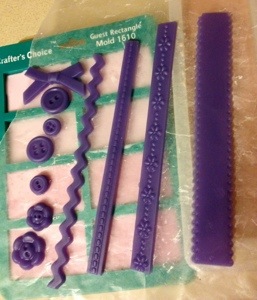
Ah, Spring is here (well, it forgot to come around my house yet, but the calendar says it’s here) and love is in the air (could be the flu too, but love is way more poetic). And I have a new love. That little silicone fondant mold I bought yesterday is my absolute favorite non-techie item right now. Wanna join for a little “Hallelujah”? *grin* I swore I heard it when I tried the mold out today and the soap was set, and removed, within the hour.
I decide to do the prep work so that I can try decorating soaps tomorrow, so I poured some guest rectangles, the new decoration mold, and even a loaf (more on that later). Since it’s just a test run I didn’t get overly creative on the colors and made it super simple. I thought the decorations would look cute and had a few variations in my mind’s eye, but never imagined them to turn out quite so well.
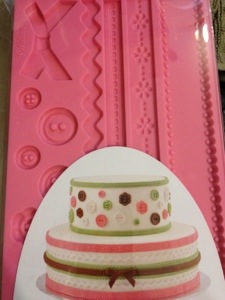
A full view of the decorations
The only real snag I ran into is that those buttons are seriously shallow. As in tip the measuring cup of soap and as soon as soap is near the spout pull up or else they get too full. Almost every one of them has a pretty rounded back, which may be a problem when I try to “glue” them all flat and neat against the bars of soap. I haven’t decided if I am going to cut the wide trims to go around the sides or if I want to use them across the top. I totally love the buttons though. *happy sigh* Here’s a close up…

It’s a little cool in the house tonight (I’m too tired to start a fire and it’s hard to get the temperature just right in the kitchen anyway), so the soap started to create a skin a bit sooner than hoped, and a bit of the skin slipped into the really wide trim piece, which is why it’s a little wonky. I really like the cute trim, to the left of the wide piece. Everyone knows I’m not usually into “cute”, but that trim is adorable.

I’ll experiment with the decorations on the pink glittery guest rectangles underneath the wax paper. It may be an extra day before I post any examples if they’re too embarrassing. Lol. Just a fair warning.
Last, I decided to pour a quick small loaf using a blend of my coffee FOs (Hazelnut Cappuccino and Coffee Beans). Once it sets I plan to smooth some bath frosting over it and see how little slices look. I may even drizzle a little dark soap, in Hazelnut, over the frosting too.
 I almost added some ground coffee to the soap, for mild exfoliation and because it’s a natural deodorizer, but decided I wanted to try a pretty version first. *grin*
I’m pretty happy with today’s pours. I had an epiphany earlier that if I was still painting instead of making my products, I wouldn’t be so worried about losses and taxes. That realization helped take the pressure off and I’m just going to have fun this year. That made today’s pours really enjoyable and I’m even more excited to try using these decorations. *big smile* I’m crossing my fingers that I have something fun to post tomorrow.
Soap Decorations
I went to Hobby Lobby today while running errands to see if they had any containers that would be just right for the Splish Splash Duck Soaps. Although I didn’t find anything for that I found some really cute fondant molds.
I’ve been eyeing what the wholesaler calls “Deco It” molds. Basically they’re molds with several detailed and shallow patterns. You pour colored soap into the details and when they’re unmolded you “glue” them (with a little soap and alcohol) onto the surface of your main piece of soap, making it quite impressive. You can make a simple square soap into a package, scatter flowers all about, or put a fancy little border around your soap. I’ve been itching to try this since they came out on one of my wholesaler’s sites, but couldn’t justify the cost.
While looking at the fondant tools (you’d be amazed how many things can be repurposed for soap) I saw their fondant molds and realized that the “Deco It” molds are really just these fondant molds. *grin* Plus, they’re a bit cheaper, too. *small happy dance* I had a really hard time deciding, but even Larry liked this one, so I got a really cute mold.
The trim could be really cute across the top of a bar or along the border of a guest round, while I think soap buttons would be one of the cutest additions for a kid’s soap. Larry thinks the bow might be neat as an embedded soap, too. I’m so anxious to try these decorations out. I hope I have some examples to share soon, but couldn’t resist showing you.
I hope you have a great night and a happy Wednesday!
Catching Up
I got hit by a migraine last night, so I couldn’t stand the light in order to post an update on the melts, but I promise that I was (maybe excessively, as my husband claims, although I wouldn’t apply that term *grin*) experimenting on the cocoa massage melts. I really, really like the smell of the melts. That sounds a little goofy, but have you ever ran across some synthetic chocolate scented items that just don’t smell real? Or they are so overwhelming they’re almost tangible and smacking you so hard that you’re amazed that your nose isn’t broken? The Fudge FO gave a little depth to the actual dark cocoa powder and I’m a tad over the moon about it. *smile*
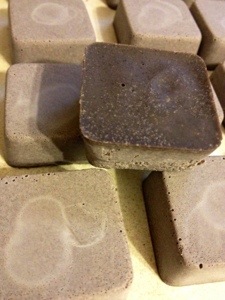
I have to admit that the texture of the melts has puzzled me a bit. Hastening the setting up of the melts by cooling them caused a super dry, and sometimes cracked, exterior. The testers that were left out don’t have the same look, but after breaking every single one of them into pieces I know that they still haven’t fully set inside. *sigh* I’m not sure which I prefer or will use, but I actually like them both.
Despite the dry exterior the melts have a lot of pampering to offer. By letting it sit on your skin for a few it warms up and you can spread some of the melt across your skin. If you get a little impatient (*whistling innocently and cleaning the cocoa out from under my nail*) you can give a quick blast from your hairdryer and it’s the perfect temp to spread. *grin*
The only downside, to me, is that it can take a little more rubbing than expected to get the cocoa rubbed in, so if you (or your incredibly impatient helper that wants to be looking at Craig’s List instead of rubbing stuff into your skin) don’t give it enough rubbing you’ll have some brown streaks until it naturally finishes soaking in. Lol.
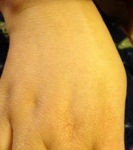
One last bit I love about the melts is that even if you need to wash up the oils create a barrier on your skin, so the water just beads right up, and your skin keeps getting nourished for hours.
See, it worked!
Melts Part 2
Please join me in patting myself on the back because I managed to patiently wait until late this morning to poke the cocoa melts. *smile* However…it wouldn’t be something that I made if it came out right the first time. *cracking up*
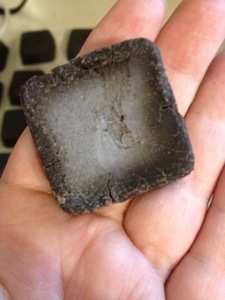
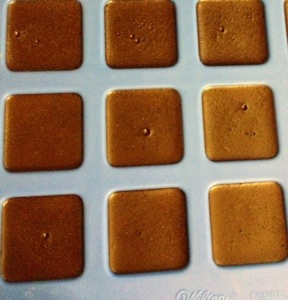
I poured three testers in beach themed molds so that I wouldn’t mix them up with what I hope to sell. So first I poked lightly and was encouraged. Then I tried to unmold one and it looked like I tried fingerprinting with chocolate pudding. Lol. A part of me, the chocoholic freak part, marveled at how it kind of looked like a really yummy truffle. *grin* I wrapped the entire mold of guest squares with cookie sheets and wax paper sandwiching the mold, and popped the whole bit in the refrigerator.
 A Truffle Massage Maybe?
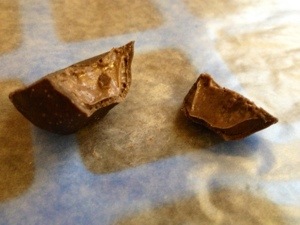
After a trip to the city to get chocolate Frosties because we couldn’t take the constant temptation of smelling cocoa, and a few French fries for the dog *grin*, I pulled them out and they popped right out of the mold. Unfortunately the cold made them look a little odd.
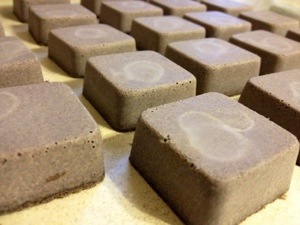
I have them warming to room temperature now while crossing my fingers that they turn a fudge-like brown again instead of this ashy color. The bottom of the melts, the side that was exposed overnight, is completely different.
After a lot of pondering those odd circles which are definitely not a part of the mold I finally realized that those are where I poured the mixture into each one! Lol. I’ve never seen this before and at first I was so disappointed because they don’t look all perfect. Then I took a deep sniff of them and realized that even if they don’t darken and the circles aren’t what I expected, they’re pretty cool. *grin* I’m going to keep working on my patience and in the morning we’re going to test one. It’s hard to frown when you smell like chocolate and have some really silky skin. 🙂
Gauntlet Link
I wanted to share the link to the blog that inspired me that I discussed in my earlier post. Not only is it an enjoyable quick read and helps this blogger get more exposure, it might just inspire you to accept the challenge. If you decide to, please let me know and keep me posted as you go. Having a workout buddy is helpful and I think that concept applies well to this challenge. If you need help setting up a free blog to document your challenge, don’t hesitate to contact me. Maybe if everyone participating in the challenge reached out and helps another, then we might all get an extra benefit of connecting with others. 🙂
Cocoa Moisturizing Massage Melts
*stops dancing mid-rump shake, blushing from being caught* I thought it might take you a little longer to get to Part 2, so I was doing a little happy dance while looking at my little army of melts on the cabinet. I knew I should have stuck with a cool and casual head bob to my favorite song by Fun.
Anyway, I finally got to try making massage melts and I’m really excited over them. Unfortunately the melts are taking forever (queue the teenage dramatic eye roll of “this is so lame”) to set up. I, um, kind of made a really gross looking blob out of one tester when I tried to unmold it a little bit ago. Lol. Looks were definitely deceiving. Soon, my friends, I will post my deliciously scented finished product, but in the meantime I’ll share the process.
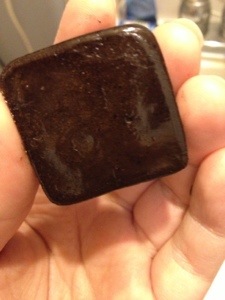
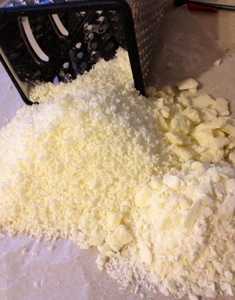
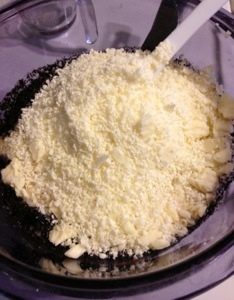
The Cocoa Moisturizing Massage Melts are basically a chocolate snack to your body. Instead of nibbling on that piece of Dove or that Easter chocolate rabbit that you hid behind the sofa cushion to attack rabidly when PMS hits, you actually do want this chocolate to go to the hips…or elbows, back, etc, and I want to test it on freshly shaved legs. I started with dark cocoa powder (rich in antioxidants); then added beeswax granules, grated cocoa butter, sweet almond oil, and I boosted the divine scent just a bit more with some Fudge Brownie FO. *happy sigh* I wish I could bottle the resulting smell for those raving lunatic, must-have-chocolate-or-someone-will-die, days. Lol.
I admit that it was the first time that I ever grated cocoa butter. I can’t even think of how to adequately describe the weirdness of how it melts in the hand while being grated, so my hand looked so oily. I couldn’t decide if I should let my mind play in the gutter over it or if I should wrinkle my nose and go all “eww” over it. *grin*
In a double boiler (well, my generic version anyway lol) I mixed everything together. It looked really odd at first.
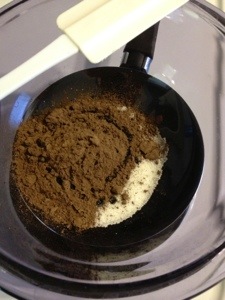
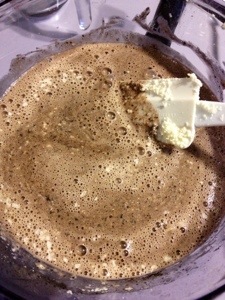
It took me a while to get the heat just right for everything to melt. Beeswax granules are easier to handle and supremely easy to measure, but I had a hard time getting them to melt. As things began to melt and blend I was reminded of chocolate pudding.
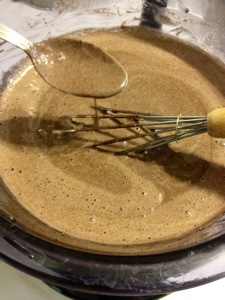
Suddenly everything was just right when I dipped the spoon in again to watch how the mixture dripped and I had to work fast when I turned the burner off. The mixture was poured into a large measuring cup to make it easier to pour and then I immediately poured into my guest squares mold. I had a little extra scraped from the edges of the bowl and cup that wasn’t as nice and creamy, since it’d been off of the heat a few minutes at this point, which I got into a couple of small molds to use as testers. I still think of chocolate pudding when I look at the melts.
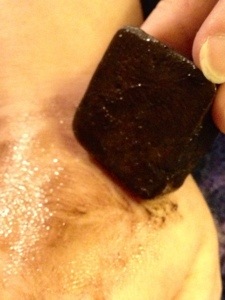
We tested what was left on the spatula and took “control” pictures to see how it will change with time, etc. My husband didn’t quite expect to be a tester. I suddenly walked up to him and smeared it down one of his legs while he was laying in the recliner. *cracking up* There were a few fun comments made, but then I think he started to enjoy the spontaneous leg rub. Next he got it tested on a hand and then I had him test it on my back, so we’d have several ranges of skin in the test. There was a bit of trouble with the cocoa leaving a slight tint when massaged into body hair, like manly leg hair. *grin* I’m going to keep checking it periodically and even seeing if it’ll rub in further with time. The patch on my arm and then the one on the elbow are both incredibly silky five or six hours later. The secondary, and most important, test is to see how the melts perform after they’ve set up. We have a baseline of expectations and I’m super anxious to get them un-molded.
So that I’m not tempted to poke the melts until they are set up (yep, I’m that kind of person that pokes jello and bruises lol), I’m going to go lay down and savor the lingering smell of chocolate. I can’t wait to share more about them with you soon!
The Challenge and Melts
This may turn into a two part post – it just depends how many words I can cram in under the limit…I mean *cough* how concise I can be. *grin* My strength was always in creative writing and not journalism, mostly because I love descriptions that wrap around you like your favorite fuzzy blanket, instead of a straight shooting line that smacks you between the eyes. *smile* Anyway, I reserve the right to continue this post because I have lots of ideas to share right now.
While I was really sick (actually only now am I starting to feel like a human again instead of a casing for phlegm – ewww, gross alert! *grin*) I caught up on some reading. I’m sure you probably know that I love to read and that it understandably means that I follow a lot of blogs. For awhile I had to prioritize and missed out on some blog posts. Well, one of my catch ups is on The Jackie Blog. I think this blogger is really engaging and I’m impressed that she has issued The Gauntlet to help motivate others to improve their lives. She’s accomplished a lot with her personal challenges and is really inspiring to me, especially because she’s honest and forthright about not wanting to do stuff some days. The challenge is to pick something in your life to improve that is quantifiable, for at least 30 days, and she has some incentives as well, although all participants will have the benefit of improvement no matter what. Well, I decided that I’d really like to apply the challenge to my business. Although I think about the business a lot and do a lot of research, I haven’t felt overly productive or successful lately, and I’m hoping that dedicated time with a little tough love will help both my feelings about my business as well as the business itself. So, although the challenge officially starts April 1st, I’m giving it a go now. We all know I’m not patient when I have an idea. *grin*
I totally nerded out and made an outline of goals to accomplish during the challenge, as well as a few other items to work on or consider. It’s a little sad to think about (let alone say) that I’m going to be removing some products from my line strictly because they don’t sell. My husband got a few extra days off and we couch potato-ed to help me recuperate, plus spend time together. Anyway, one show we caught up on with the DVR is Shark Tank. It’s one of those hate to love it shows for us. *grin* Just my luck one of the applicants was a young girl who is creating and selling homemade scrubs. She has a few variations of them, but that’s all. Of course Larry keyed in on that business model and said that I need to apply it to mine. “You need to focus on one or two items that actually sell instead of so many options that don’t always sell.” I understand, I totally do, and I know how he is looking at it. However, you have to have a bit of variety and change in order to find what is a perfect fit for the business and fills someone’s needs. I set my feelings aside and decided that I’d compromise by restructuring a bit, and I’ll also keep experimenting, but I’ll try to keep the new items under the main lines now.
I admit that this is a bit scary and kind of sad to revamp the business. The bad side of homemade sometimes is that every creative item has a little piece of your heart and hopes mixed in, so when they are unsuccessful you feel a bit emotional about it. However I am going to pull my big girl boots on and make bigger, and better, tracks for my business to step into.
First, several items that have never sold or seldom sell will be completely removed. I’ll have my friendly line reminding customers to please inquire if you don’t see what you’re looking for, because I may still be able to make that item, but I’m losing money by having them available full time.
Second, I’m going to come up with a brand logo that will go with the company name and product title on the main label. I’ll also probably add a label to the back for the “do not eat”, which will help to make the product label much more interesting and professional. That girl on Shark Tank had some really adorable packaging and a cute label. I know it’ll take some work and may not be finished within the month challenge, but it is a key priority to me, and one goal of the challenge that I’m really excited about.
Third, I need to finalize and implement the concept of “As Supplies Last”. I’ll use that for trying out my experiments and things that won’t be made any more, but I still have stuff on hand. I’ll see if the new items sell well and if they do, then they make it to a standard page of my website. If items don’t sell or ideas fall flat, they get a reduced price and will be removed once appropriate. It will be a lot easier than having to dedicate fluctuating space on my standard pages when they’re set up fairly well right now.
Fourth, I really want to do a sale. Larry thinks it needs to be labeled as a liquidation sale, which in my opinion is what the As Supplies Last page really is. I want to do a flash sale. I have a few real reasons behind this idea – I personally love to shop them so why wouldn’t others, I can control the time frame, I can possibly do high volume at a more discounted price for a limited time which will still make me more than slowly selling off a few at the moderate liquidation sale price, and lastly, it may generate some interest and excitement. When I’m excited about something it comes bubbling out of my mouth any time that the conversation goes idle, and if anyone else gets that excited, maybe they’ll spread the word to their friends and I’ll get some new sales.
Lastly, I have some smaller goals such as working on gift giving/boxing options that make the products even more attractive, better marketing, and some good ol’ tedious work like changing some names, editing my site, getting improved pictures to use in marketing, and whatnot.
I think I have a few months of work outlined, plus my work on trying some new items. I have the supplies on hand, so when I get a creative urge, I’m going for it. *grin* I hope to do a few featured ingredient posts to help everyone know a little bit more about a cool item and I have a few little summer recipes that I will share. They use perishable ingredients, so I can’t sell them, but I think some will appreciate them, even if they only get to the recipe via Pinterest. If there is something you would like me to write about, such as a specific ingredient or product, or whatever, please drop a comment and I’ll add it to my outline. Periodically I’ll share my overall challenge status with you, because that will help motivate me when I don’t feel well. I’ll be held a bit more accountable, even if you don’t honestly give two figs if I succeed at the challenge. Just acknowledging the challenge and putting that into the forever zone of the Internet…that helps me feel more accountable than when it’s just for my eyes only. *grin*
Now, I also mentioned melts, which is something I’ve been impatiently waiting to discuss, but I’m running out of space, so I’m taking the allowance I gave myself earlier and making a second post to accompany this. I’ll see you on the other side of the post. *big grin*
