RSS Feed

Tag Archives: Recipes

A Harvest Meal

Harvest Chili with Cheddar Apple Quick Bread

This meal looked so amazing to me that I asked Leah to blog it, because I think a lot of us are in the mood for Fall dishes. 🙂 – GC

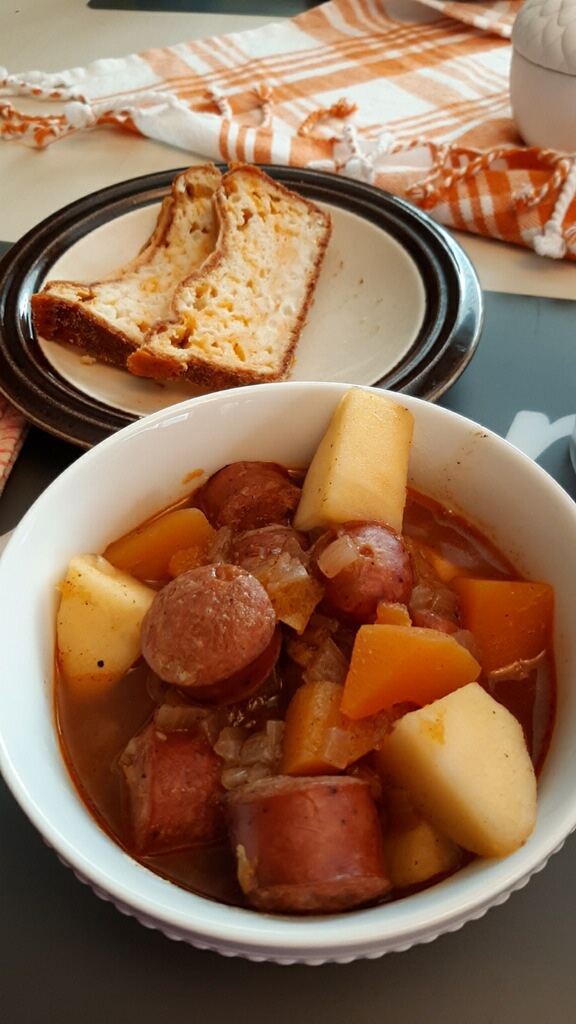
First is the amazing Harvest Chili recipe. It’s actually from Better Homes & Gardens here. I’ll copy and paste for your convenience too, but they get all the credit except for the amazing, mouth-watering, picture of it that Leah took and all her work! 🙂
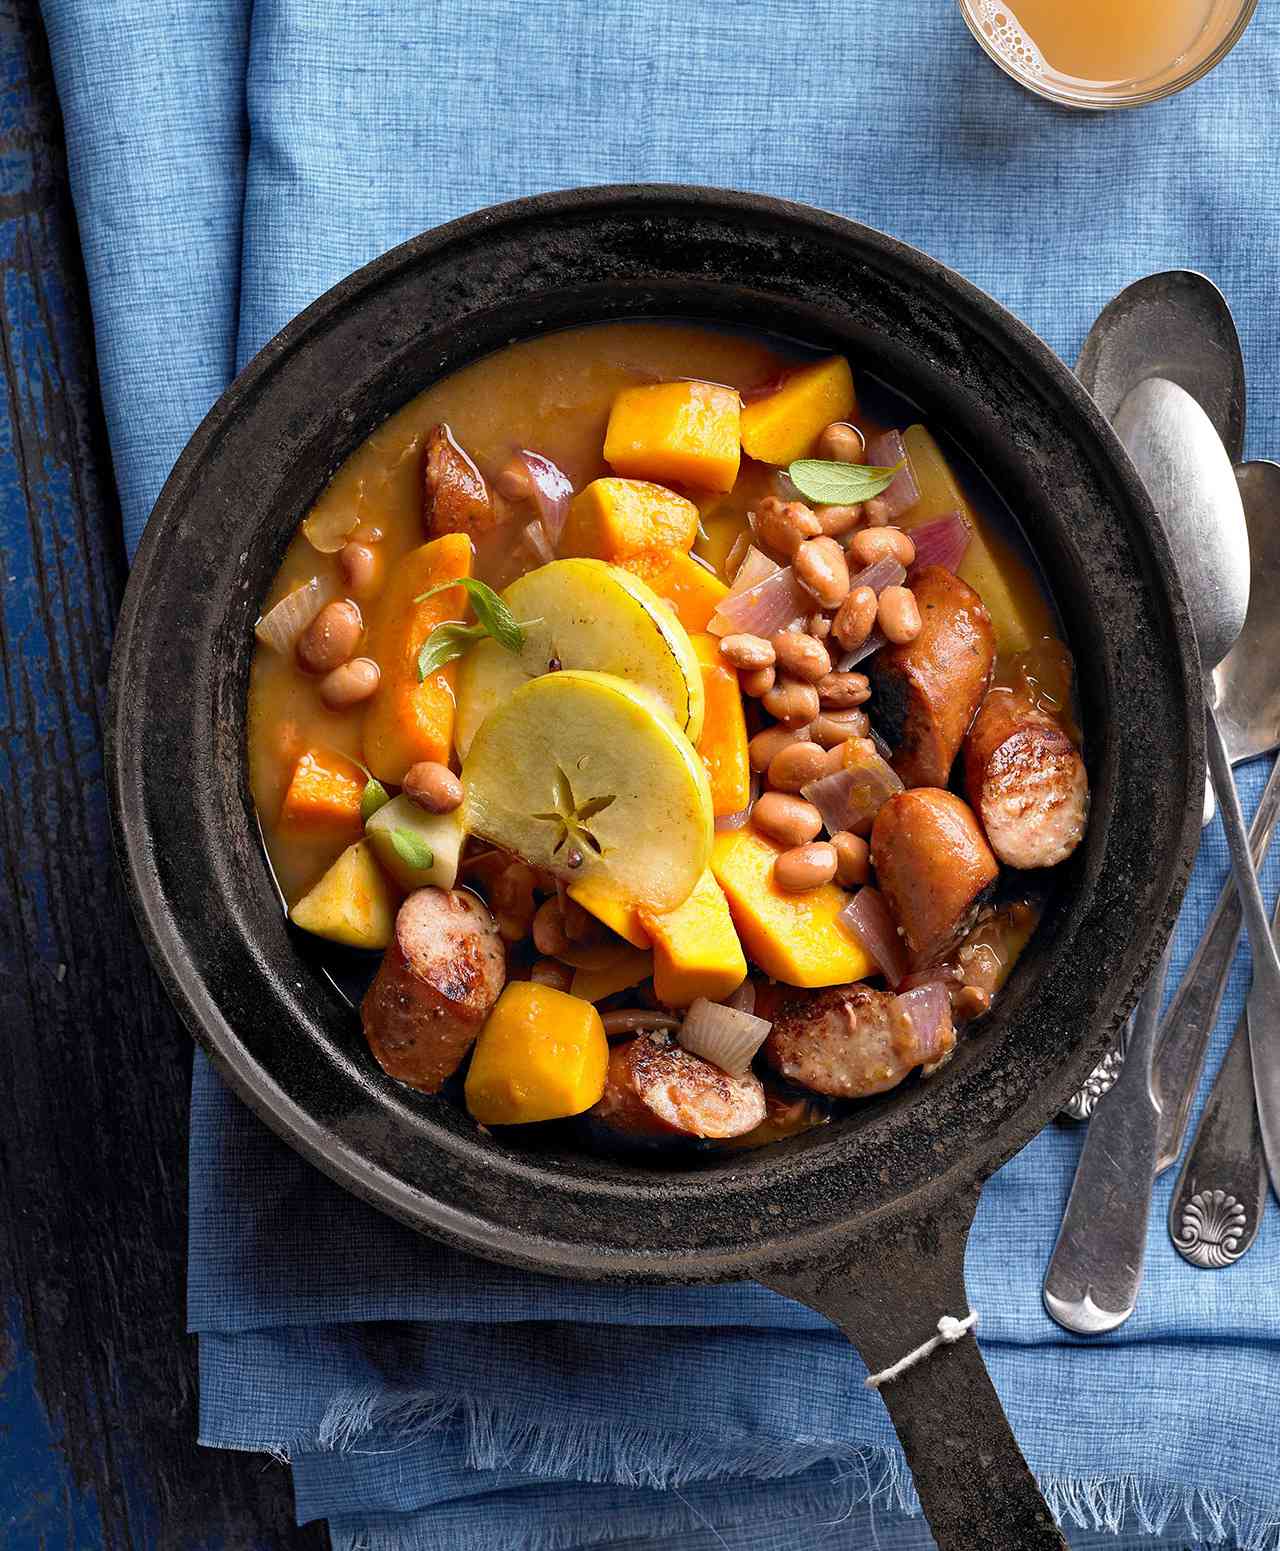
Harvest Chili

Chicken-apple sausage pairs with tangy-sweet cooked apples instead of that chili regular–tomatoes.

Serve this chili over hot cooked polenta.

Prep:30 mins; Cook:30 mins; Servings:8

Harvest Chili

Andy Lyons

Ingredients

  • 2 tablespoons olive oil
  • 1 ½ pounds cooked chicken-apple sausage links, cut in 1-inch pieces
  • 2 large red onions, chopped (3 cups)
  • 3 cloves garlic, minced
  • 1 large butternut squash, peeled, seeded, and cut in 3/4-inch chunks (about 6 cups)
  • 2 teaspoons chili powder
  • ¼ teaspoon salt
  • â…› teaspoon cayenne pepper
  • 3 cups reduced-sodium chicken broth
  • 3 Granny Smith apples, peeled, cored, and cut in 3/4-inch slices (**Leah notes that she chunks the apples instead of slicing, and she’s an amazing cook, so I’d definitely follow her example!**)
  • 1 15 ounce can pinto beans, rinsed, drained, and slightly mashed
  • 1 tablespoon snipped fresh sage or tiny sage leaves
  • Golden Delicious or other apple, sliced in rings

Directions

  • Step 1 In a large Dutch oven, heat 1 tablespoon of the oil over medium-high heat. Add the sausage; cook for 5 to 6 minutes, until browned, stirring occasionally. Remove sausage with a slotted spoon.
  • Step 2. In the same pan, cook onion and garlic for 2 to 3 minutes, stirring occasionally, until nearly tender. Add the squash; cook for 5 minutes. Stir in the chili powder, salt, and cayenne; cook for 1 minute. Return the sausage to pan. Add broth; bring to boiling, then reduce heat. Simmer, covered, for 8 minutes.
  • Step 3. Meanwhile, in a large skillet, heat remaining oil over medium-high heat. Cook apple slices in hot oil for 4 to 5 minutes, stirring occasionally, until light brown. Transfer apples along with beans to chili. Simmer for 3 to 4 minutes, until apples are tender. Top servings of chili with sage and apple rings.

Nutrition Facts 

Per Serving:356 calories; total fat 11g; saturated fat 3g; polyunsaturated fat 1g; monounsaturated fat 3g; cholesterol 60mg; sodium 944mg; potassium 699mg; carbohydrates 48g; fiber 8g; sugar 23g; protein 20g; trans fatty acidg; vitamin a 111IU; vitamin c 30mg; thiaminmg; riboflavinmg; niacin equivalents 2mg; vitamin b6mg; folate 44mcg; vitamin b12mcg; calcium 91mg; iron 3mg.© Copyright 2020 bhg.com. All rights reserved. Printed from https://www.bhg.com 09/16/2020

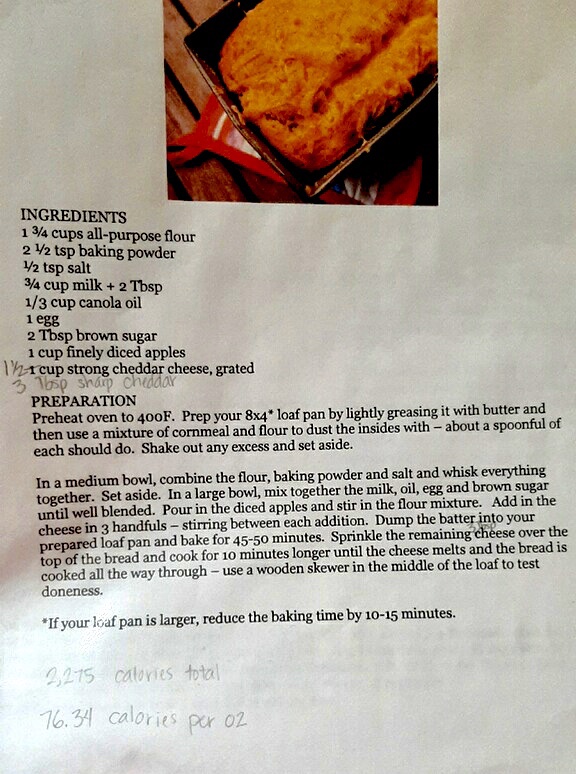
Cheddar Apple Quick Bread (source not available)

And I’m going to do something unusual here. I’m actually going to post a pic of the recipe she was using, because of her hand-written notes where she adapted the recipe and it’s written up nicer than I can do using the new block editor on the blog without paying for an upgraded blog that allows for a recipe widget. I personally like that I can print the pic to have the recipe, instead of highlighting too, but I’m weird like that. Lol

I hope you enjoy the recipes and are staying safe during such incredibly turbulent times in the world! Hopefully a comforting Fall themed meal brings a little joy to your day, like it did mine. – GC

Fuji Apple Salad Recipe by Leah

Leahs New Logo


Panera Bread® sells a fabulous Fuji Apple Salad with seasoned chicken breast, crispy apple chips, and an AMAZING apple vinaigrette.  It is sooo good!  I love the combination of crunch with the saltiness of the chicken and nuts, all topped off with the sweet tangy dressing.  When I saw the grocery store selling Panera’s® dressing I may have squealed in delight. I grabbed two bottles just in case it was a one-time thing.  When I got home my thriftiness crept in.  “I can make that.  I love that salad.  What have I been waiting for?”  I tried a few times and have ended up with an apple vinaigrette I love.

My salad is slightly different than Panera’s®.  They use chicken, but I usually leave it out and serve this as a side.  They use apple chips and I use thinly sliced apples.  They use toasted pecans and I use candied.  Either way, this salad is a winner.


Fuji Apple Salad

yield: 6 servings


INGREDIENTS

dressing

2 Tbsp apple juice concentrate

1 tsp Dijon mustard

1 Tbsp white balsamic vinegar

1/4 tsp salt

1/4 tsp freshly ground black pepper

1/4 cup Canola oil

salad

12 cups mixed greens

2 chilled fuji apples, cored and thinly sliced

1/2 cup crumbled Gorgonzola

1/2 medium red onion, quartered and sliced

1 cup grape tomatoes

1/2 cup candied pecans

PREPARATION

  1. Blend all dressing ingredients together and set aside.  You’ll have more dressing than you need.
  2. In a large bowl, gently toss greens with dressing.
  3. Divide among plates and top with remaining ingredients.

Marshmallow Oreo Chip Cookies, Adapted Recipe by Leah

Leahs New Logo


A few years ago I came across this Marshmallow Oreo Chip Cookie recipe© from The Gracious Wifeâ„¢.  I knew they would be delicious just reading through the recipe, but it didn’t prepare me for just how good they would be.  A couple weeks later I made them again for a dessert table at a birthday party.  You wouldn’t believe how many people approached me about them!  Some wanted the recipe, some wanted to know if I would be willing to make and sell them, and there were even a few who sheepishly asked if they could take some home.


When I was whipping up the batch for this blog post my sister happened to call.  The conversation went like this…

“What are you doing?”

“Oh, I just took some cookies out of the oven.”

“Which ones?”

“Oreo and Marshmallow”

“Are those the ones with the Cookies n’ Cream bar?”

“Yes.”

“I’ll be right over.”

And she was!

I’ve made a few small alterations over time so if you want the original recipe be sure to check out The Gracious Wife blog©.


Oreo and Marshmallow Cookies


Marshmallow Oreo Chip Cookies, Adapted


INGREDIENTS

1/4 cup sugar

1 cup brown sugar

1 cup butter, softened

2 eggs

1 tsp vanilla

4.2 oz pkg Oreo cookies ‘n creme instant pudding

1/2 cup unsweetened cocoa powder

1 teaspoon baking soda

1/8 teaspoon salt

2 1/4 cups flour

1 cup mini marshmallows

6 oz chopped pieces of Hershey’s Cookies ‘n Cream bar

8 Oreos, coarsely crushed


PREPARATION

  1. Preheat oven to 350 degrees F.
  2. In a large mixing bowl, cream butter and sugars.
  3. Add eggs and vanilla and mix again.
  4. Mix together flour, baking soda, and salt. Add to butter mixture, along with cocoa powder and pudding mix. Stir until everything is fully combined.
  5. Fold in marshmallows, chopped candy bar, and crushed Oreos.
  6. Chill dough for about 30 minutes.
  7. Scoop rounded tablespoons of dough and shape into balls. Place on a greased cookie sheet (and I DO mean greased. None of that wimpy cooking spray. You’re going to have to break out the butter and slick it down because marshmallows are sticky!) or silpat 2 inches apart.
  8. Bake for 8-11 minutes.  When they come out of the oven you can use a greased butter knife to gently push the marshmallows that have spread back against the cookie edges.  Allow the cookies to cool on the cookie sheet before moving.

Beef Gyros with Tzatziki Sauce – Pressure Cooker Recipe by Leah

Leahs New Logo


Tasty and easy beef gyros are bursting with hearty flavor!  Traditionally, gyro meat is cooked on a vertical spit and shaved off.  Though I’m dying to try making it that way, it’s not really practical in a home kitchen.  It’s also typically made with lamb, but that’s not too practical for my budget. ☺  What is practical is eating tender, mouthwatering beef,  wrapped in a soft pita, dripping in creamy sauce.  What could be better?  That it’s a year-round friendly recipe!  It’s hearty and filling for those cold winter evenings, but perfect for the heat of summer too.  Using your electric pressure cooker means you’re not heating up your house with your oven or stove.  No pressure cooker?  Just grill your roast instead!  Don’t forget to make your Tzatziki sauce ahead of time.


Beef Gyros with Tzatziki Sauce


Beef Gyros with Tzatziki Sauce – Pressure Cooker

yield: 4-6 servings


INGREDIENTS

Beef

2 lb chuck roast

2 Tbsp extra virgin olive oil

2 tsp garlic powder

2 tsp dried oregano

1/4 tsp cumin

1 tsp dried basil

1/2 tsp ground cinnamon

1/2 tsp dill

1/2 tsp marjoram

1/4 tsp thyme

1/4 tsp ground nutmeg

3/4 tsp salt

1/2 tsp pepper

2 Tbsp fresh lemon juice

1/3 cup beef broth

Tzatziki sauce

1 cup English Hothouse Cucumber (about half of one cucumber)

1 Tbsp kosher salt

2 Tbsp fresh dill, minced or 1 Tbsp dried dill

1 garlic clove, grated or minced

4 tsp lemon juice

1 cup plain Greek yogurt

For serving

warmed pocketless pitas

tomatoes, sliced

red onion, sliced

feta crumbles


PREPARATION

Tzatziki sauce

  1. Peel, seed, and cut into large chunks.  Sprinkle with 1 Tbsp salt.  Let sit 30 minutes.  Drain and dry cucumbers by pressing lightly with a paper towel.
  2. In a food processor or blender add cucumbers, dill, garlic, and lemon juice.  Process then stir into the yogurt.
  3. Refrigerate at least 2 hours.  It keeps for a few days in the refrigerator but you will need to drain off any water and stir each time you use it.

Beef

Mix together the spices then rub onto the roast.  Put oil in the bottom of the Instant Pot.  Set the roast in and add lemon juice and beef broth.  Lock the lid and cook for 15 minutes.  Allow to natural release for an additional 15 minutes.  Quick release and remove roast to a cutting board.  Shred or thinly slice your meat and add remaining liquid until the meat is moisted to your desire.

Serving

Lay beef in the center of the pita.  Spread some Tzatziki sauce over the meat and add tomatoes, onions, and feta as desired.


Sausage Cheese Balls Recipe by Leah

Leahs New Logo


These little appetizers are a big hit at parties.  It seems they’ve been around for ages.  So long, in fact, some might consider them old-fashioned, but all that really means is that they’ve stood the test of time.  They’re always among the first things to disappear from the table.  Bonus! They can be frozen before or after baking!

Sausage Cheese Balls


Sausage Cheese Balls


INGREDIENTS

2 cups Bisquick

1 lb ground spicy pork sausage, room temperature

10 oz shredded medium cheddar cheese, room temperature

4 Tbsp water, as needed

spicy mustard, for dipping


PREPARATION

  1. Preheat oven to 400 degrees F.
  2. Break ground sausage into chunks.  Mix in the Bisquick, cheese, cheddar and 2 Tbsp water.  I use a stand mixer but it can be done by hand as well.  Continue until the mixture holds together and there are no unincorporated ingredients in the bottom of the bowl.  If the mixture isn’t coming together add more water (or hot sauce) 1 tablespoon at a time.
  3. Shape the mixture into balls, rolling in your hand to smooth.
  4. Line a rimmed baking sheet with aluminum foil and spray lightly with cooking spray.  Place sausage balls on the pan.  They should not touch.
  5. Bake for 15 minutes.  Use a spatula to transfer the sausage balls to a serving tray and serve with spicy mustard.

Dry Rub Roasted Tri-Tip Recipe by Leah

Leahs New Logo


Tri-tip is a popular cut of meat in this area, especially at barbecues.  It’s easy to see why.  The cut is full flavored, relatively low in fat content, and all at a comparatively lower cost.  Plus, it’s easy to prepare!  We love to make extra and slice the meat more thinly to make sandwiches.  Just lay the meat on some sourdough, drizzle your favorite barbecue sauce (not too much. You don’t want to overwhelm the flavor of the meat), add a slice of Pepper Jack and you’re all set.


Dry Rub Roasted Tri Tip


Dry Rub Roasted Tri-Tip

yield: 6-8 servings


INGREDIENTS

1 whole tri-tip (or santa maria cut), about 2 lb

soy sauce

2 Tbsp olive oil

dry rub

1 1/2 Tbsp kosher salt

1 1/2 Tbsp granulated garlic

1 heaping tsp black pepper

1 Tbsp brown sugar

1/4 tsp cayenne

1/4 tsp ground cloves

1/4 tsp cinnamon

1 Tbsp cocoa powder


PREPARATION

Mix together the dry rub ingredients.  Set aside.  Coat your tri-tip with soy sauce.  Allow it dry a little until sticky.  Then, sprinkle your tri tip with the dry rub, massaging all over.  Wrap the tri tip in plastic wrap and refrigerate overnight.


Roasting Method

Remove the tri-tip from the refrigerator 1 hour prior to cooking.  Preheat your oven to 425 degrees F.  In a large, heavy oven-proof skillet heat 2 Tablespoons olive oil over high.  Add the tri-tip fat-side down.  Turn the heat to medium-high and sear the roast for about 4 minutes.  Turn the roast so it’s fat-side up and place the skillet in the oven (or transfer to a shallow pan).  Roast 30-40 minutes or until an instant read thermometer registers 130 degrees when inserted into the thickest part of the meat.  Rest roast on a cutting board and tent with foil for 15-20 minutes.  Slice against the grain and serve.


Grilling Method

Remove the meat from the refrigerator an hour before cooking.  Prepare charcoal grill or heat a gas grill to high.  Place roast on grill and sear one side well, 6 to 8 minutes, checking for flare-ups.  Turn the roast and sear other side for about the same time.  Then lower gas to medium-high or move the meat to a cooler part of the charcoal grill.  Turn meat again and cook another 8 to 10 minutes.  Flip and cook again.  A 2-pound roast will require about 20 to 25 minutes total cooking time.  The roast is ready when an instant-read thermometer reaches 130 degrees when inserted into the thickest part of the meat.  Rest roast on a cutting board and tent with 15 to 20 minutes.  Slice against the grain and serve.


NOTES

Tri-Tip roast is shaped like a boomerang, so either cut it in half at the center of the angle, or slice against the grain on one side, turn the roast and slice against the grain on the other side.

Butter Chicken Recipe by Leah

Leahs New Logo


Butter Chicken (Chicken Makhani) is a really popular dish in Indian Restaurants and with good reason.  It’s a full-flavored dish with a lovely, mildly spiced curry sauce.  Though traditionally made with bone-in chicken I choose the easy route of boneless, skinless chicken thighs every time.  We like to serve it with naan and raita.


20180323_171507


Butter Chicken

Yield: 6 servings


INGREDIENTS

2 Tbsp butter

2 Tbsp vegetable oil

2 lbs boneless, skinless chicken thighs

1 yellow onion, diced

3 cloves garlic, minced

2 tsp curry powder

1 Tbsp curry paste

1/4 tsp red chili powder

1 tsp dried fenugreek leaves (kasoori methi)

2 tsp tandoori masala

1 tsp garam masala

1 6oz can tomato paste

15 green cardamom pods *

1 14oz can coconut milk

1 cup plain yogurt

salt, to taste

1 bunch cilantro**

basmati rice, prepared

PREPARATION

  1. Melt the butter and vegetable oil in a large skillet over medium heat.  Stir in the chicken, onion and garlic.  Cook and stir until the onion has softened and turned translucent, about 10 minutes.
  2. Stir in the curry powder, curry paste, chili powder, fenugreek, tandoori masala, garam masala, and tomato paste.  Stir until no lumps remain.
  3. Add the cardamom pods and coconut milk, stir.
  4. Put the yogurt in a medium bowl. Very slowly add about 2 cups of the tomato sauce, stirring continuously.  Then, pour the entire thing back into the skillet.  Season to taste with salt and simmer 15-20 minutes, or until chicken is cooked through.
  5. Remove and discard cardamom pods.  Place butter chicken into serving dishes, add a side of basmati rice, and top with cilantro.

*Take a needle and thread, pierce the needle through the top of the cardamom pod.  Continue with all the pods and tie the ends together.  It makes it much easier to remove them when the butter chicken is done.

**Georgia’s Nerdy Note: If you are unable to eat cilantro, you can swap parsley for it.  Some people have the same genes, OR6A2, which cause cilantro to taste like soap due to picking up other scents that those without the gene set detect.  Parsley is an easy swap, so you don’t miss out!

Pressure Cooker Chicken Breasts

Leahs New Logo


When you’re looking for maximum juiciness in meat you use your Instant Pot or Power Pressure Cooker XL, and though I’ve only had mine about a year, it has gotten a ton of use.  I love to use it to make whole roasted chickens, but sometimes you need sliced or chopped chicken for a recipe.  On those occasions this is the chicken I usually turn to.


Chicken Breast


Pressure Cooker Chicken Breasts


Ingredients

2 Tbsp olive oil

4 chicken breasts

1 Tbsp granulated garlic powder

1 Tbsp onion powder

1/2 tsp rosemary

1/2 tsp thyme

1 Tbsp sea salt

1 Tbsp freshly ground black pepper

1 cup chicken stock

Preparation

  1. Combine spices and set aside.
  2. Preheat the saute function on the electric pressure cooker at the highest setting, adding oil to the pot.
  3. Season the chicken and brown in your pressure cooker 2 at a time, about 2-3 minutes per side.
  4. When all the chicken is browned place it in the pot and add the chicken stock.
  5. Lock the lid and cook on high for 3 minutes.
  6. Allow chicken to naturally release for 5 minutes, and then quick release.
  7. Remove the chicken from the pot and allow to rest for about 5 minutes.

Note: These instructions are based on using an electric Power Pressure Cooker XL, so buttons and times may vary slightly when using a different brand.  Do not use an old fashioned pressure cooker for this recipe.

Craisins Salad Recipe by Leah

Leahs New Logo


I learned how to cook from cookbooks.  My mom was a good cook, but when I was a teen she began to get sick and didn’t have much energy to devote to cooking, so our meals became very simple.  We’d typically have a meat and steamed veggies with an occasional Kraft Macaroni and Cheeseâ„¢ or Hamburger Helperâ„¢ thrown in.  What can I say?  I’m a child of the 80’s.  🙂  Towards the end of high school my mom was really too ill to cook, so the responsibilities came to us, her children.  I would heat up the meat and steam the veggies just as she told me to, and then, in time, my interest began to grow.  I started looking in cookbooks and finding things that looked fun to prepare.  Through natural curiosity I began to introduce new foods and new ways of cooking to the family.  I have to be honest, they weren’t always well received, but learning a new skill can be a bumpy road and sometimes things just didn’t taste that good.

One thing I learned early on is that I LOVE salads.  It took some time but I slowly won my parents and siblings over to my “rabbit food”.  This salad is one from my early days of cookbook learning and it has stood the test of time with the dressing being one of my absolute favorites.


Craisins Salad

INGREDIENTS

Salad

1 head red leaf lettuce

1 head green leaf lettuce

1 head iceberg lettuce

1 (8 oz) package shredded Mozzarella cheese

1 (8 oz) package shredded Parmesan cheese

1 lb bacon, cooked and crumbled

1 (8 oz) package craisins

1 cup sliced almonds, toasted

Dressing

1/2 cup red wine vinegar

1 cup sugar

1/2 onion, chopped

1 1/2 tsp salt

2 tsp mustard

1 cup canola oil

PREPARATION

Salad

Tear red and green leaf lettuce into pieces.  Shred iceberg lettuce.  Toss together with other ingredients just before serving.  Pass dressing over salad.

Dressing

In a blender mix all ingredients, except oil.  Add oil and blend again.

The Grey Stuff© Replica Recipe by Leah

Leahs New Logo


“Try the grey stuff it’s delicious.  Don’t believe us ask the dishes!”©  Everyone knows that song, right?  It’s from Beauty and the Beast©, a favorite movie!  Disneyland®, of course, took that line from the movie and turned it into a delectable treat.  They serve it over a red velvet cupcake and sitting on a lemon cookie.  We eat it straight out of the bowl.  * This is not an official Disney® recipe but rather a very close replication.  Movie and song lyrics copyrighted by and belong to The Walt Disney Company®.


Ae


The Grey Stuff© Replica

INGREDIENTS

1 (3.4 oz) Instant Vanilla Pudding Mix

1 1/2 cups milk

15 Oreo™ cookies

1 (8 oz) tub Cool Whipâ„¢

2 Tbsp Instant Chocolate Pudding Mix

PREPARATION

  1. In a medium bowl, combine pudding mix and milk.  Whisk well and refrigerate for 10 minutes.
  2. Place Oreosâ„¢ in a food processor and blend until they become crumbs.
  3. Mix the crushed cookies in with the pudding mixture and mix well.
  4. Fold in Cool Whip™ and chocolate pudding mix until well combined and refrigerate for one hour before serving.
  5. When ready to serve, place “grey stuff”© in a piping bag and add a dollop to the middle of a plate or bowl, and then pipe a spiral around it.

* This is not an official Disney® recipe but rather a very close replication.  Movie and song lyrics copyrighted by and belong to The Walt Disney Company®.