Okay, so technically it’s Thursday where I live, but I’m going to pretend I’m on California time and stick with it, since I want to start my “Whatever Wednesdays”. I was talking with Larry today about methods to help loosen up my fingers and get back into the groove of blogging, and said that I liked the idea of a set theme that I can always default to once a week that gives me complete freedom. No pressure to write about crafting, soaps, pampering, recipes, whatever. He wisely pointed out that “Whatever I Want Wednesdays” didn’t fit my personality and wasn’t polite like I usually am in life, and “Anything Goes Wednesdays” could make people think I’m going to suddenly talk about burlesque or some other risqué topic. *grin* Simple and to the point, so Whatever Wednesdays has been born. Granted I often go off on tangents and you never know what in the world I’m actually going to write about anyway, but an organized life leads to an organized mind is my latest motto, so I’m going to work to have some themes.
To kick it off I want to introduce you to the exciting excruciating life of a chigger. For those that haven’t been to the Midwest or Southern areas of the beautiful USA I’m going to give you the heebie-jeebies, so settle in. You’ve been warned. *evil grin* A chigger is simply a mite that is virtually invisible to the naked eye. They love to live in the grass, but especially longer vegetation, although apparently they can infest vehicles and homes even. (It gets better, or worse, depending how you look at it.) I’m not going to go into the scientific stuff with you, so I’m going to give it to you Midwest style. *teasing smile* Basically, when the chigger is in the larval stage they eat skin cells and that can be four or two legged. It was originally believed that the chigger burrowed under the skin, causing a “bite”. However, due to the amazing nerds in lab coats (you rock!), we now know that they actually inject an enzyme into the host which starts to break down the tissue and they feed on that lovely goo of decomp. The really fun part is that they prefer warm and damp areas (think about that for a second), so elbows, knees, where your socks are cinched around your ankle, armpits, skin folds (like the one that you sit on lol), and the groin are prime feeding spots. After they’ve attached and inject that enzyme into you the spot becomes a nice little feeding tube for the larva. They fall off when they’re done and become nymphs, which later develop into adult chiggers. Thankfully it’s only the larva that cause such a problem, otherwise I’d be screaming to set the whole area on fire and that the land can’t be inhabited. *grin* The Brooksville Garden Club very kindly put some informative pictures on their site, so I’m sharing two of their pics so you can get a mental image. To top it off I added a nice little close up rendering of them feeding that I found on Wikipedia.
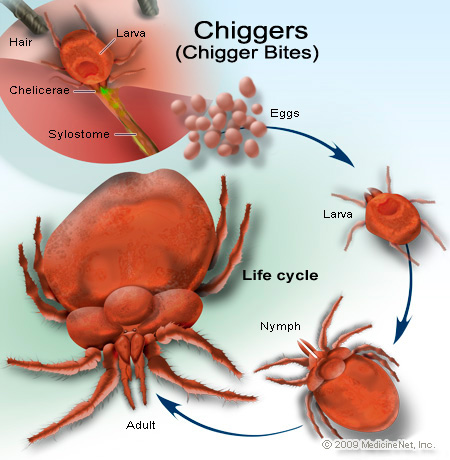
The chigger life cycle
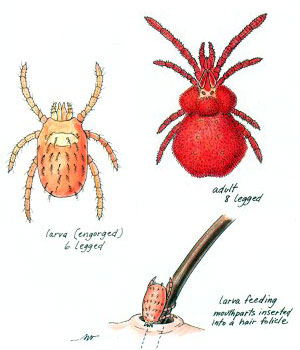
The larval chigger working some magic
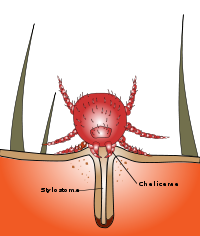
Chigger larva “biting” host
This little feeding area becomes extremely irritated, as in one of the most intense itches you will ever have in your life. There are tons of products on the market to supposedly heal thy chigger bite, but lots are just a placebo effect. We’ll look into prevention first and then some treatments to try.
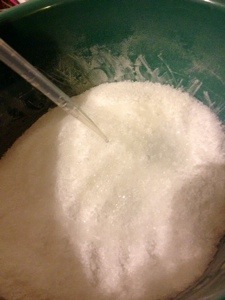
Well, you could always use lawn treatment that is indicated for chiggers, but what if you have a nice safe lawn and step out into your driveway, not noticing that some weeds or grass has pushed up through the gravel? You might consider a secondary treatment. Now this is tried and true, but doesn’t come with a 100% guarantee. Take a shower as quickly as possible and wash with the original or orange versions of Dawn Dish Soap (works wonderfully for getting poison ivy’s oils off of your skin too!). If you can, follow up the soap with some exfoliating (maybe a little Georgia’s Bath Products Mechanic Scrub, hmm? *wink*), although some vigorous towel rubbing seems to work just as well, but you’ll miss out on a chance to linger in that soothing cascade of water. If it’s just not possible to take that shower, after all you might not be THAT close to your friend that you can say you’re going to go jump in their shower, then a “spit wash” usually works just as well if you don’t need to do a large portion of the body. If you’ve just been walking, then usually washing your legs off is adequate enough, so suds up a washcloth or paper towel, scrub well, and then do a “rinsing” towel afterward. Anyone that is a super supporter of all natural stuff please close your eyes and scroll down a few lines riiiiight now. If you know you’re headed outside use a good repellent with Deet, but make sure it lists that it works against chiggers, since not all Deet ones do. Plan to look like an über weirdo and tuck your pant legs into your socks for even more protection. The evil little buggers can’t climb up your leg then, usually. I’m a big fan of Off Deep Woods combined with the dish soap scrub. (Always follow product instructions and medical advice, yada yada.) I seldom ever do the pant tucking because when it’s chigger weather in the Midwest it’s usually pretty toasty and humid, so you won’t catch me in full length pants usually. lol
Say company stopped by and you ended up spontaneously having a chat in that slightly overgrown and untreated driveway. You didn’t really have a chance to take any preventative measures and a couple of days later you’re suddenly itching in spots that would most likely embarrass your mother to see you touching. Skip all of the items that claim they help chigger bites. (You’ll still want to do a healthy rub to make sure that the larva is no longer on the skin before you apply treatments.) Instead, try a little of the good ole Vicks VapoRub. (Side note: who do I talk to at Vicks to get them to become my sponsor since I give a lot of marketing for off label uses of their products? *grin*) VapoRub has healthy concentrations of menthol and camphor, which are the main ingredients that clear your sinuses out when you rub it on your chest. (And also can help with some muscle pain, since those two ingredients are topical analgesics, but make sure you cover with something that you don’t mind getting stained up, since it’ll totally mess up cloth.) Dab some of the Rub over the horrendous lump you’ve developed and you may just find some relief.
Since everyone is different, something else might work for you. If that’s the case, try some anbesol/Orajel if you have it on hand. These often help people overcome that intense itch and also works great for mosquito bites, so I take a tiny tube with me when camping.
You can also try a soothing bath with some Epsom Salts. Remember a long time ago when I mentioned a lot of awesome benefits to Epsom or maybe that natural benefits tab on my business website that talks about the believed benefits of it? Anyway, the Epsom will usually help heal some of that inflammation from the lovely tube of rotting muck stuck in you and may even help to shrink that little puppy up. Next you can stay in the same line and apply a little skin benefiting oil (like sweet almond) to the spot and pat some plain table salt over the badge of summer honor. This will not only help to dry it up, but it may also keep air from the spot. The problem with this is that you have to lay or sit around while letting the salt dry, and once it’s dry it will start to fall off as you are active, which can get weird and uncomfortable. Although I’d say you have a high tolerance for the uncomfortable if you’re able to lay in a compromising position naked with salt and oil drying on you, anyway, since most are in those areas that must not be mentioned. lol Still in the same concept you can also apply a simple baking soda paste to the spots, much like you can for other topical allergens.
Lastly, you might stick with the original old wives’ tale of covering the spot in clear nail polish. We know that we’re not suffocating the evil little cell suckers, but the polish seals the area off from the air, which is usually part of what is making you itch, scientists believe.
I’ve read varying reports about the ability for these little guys to fall off of you when they’re done feeding and carry out their life cycle right there in your home or vehicle. If you have more than one (and seriously, who usually ever gets just one?! They’re like freaking potato chips!), and you didn’t get them off, then you never know. You might just get them inside. (Yet again, I’ve read contradictory research on this, so don’t quote me. lol Why not just try to make sure it’s not a possibility no matter what?
Oh, and in case you haven’t seen what a “bite” can look like, it can vary widely depending on how a person’s immune system responds. We have small red spots, angry welts, or even nasty blisters in response to these feeding tubes. MedlinePlus has a nice pic of the blistering version:
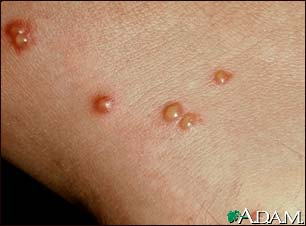
Chigger bite blisters
MedlinePlus
The Mayo Clinic has a picture of a typical collection of “bites” on their slideshow:
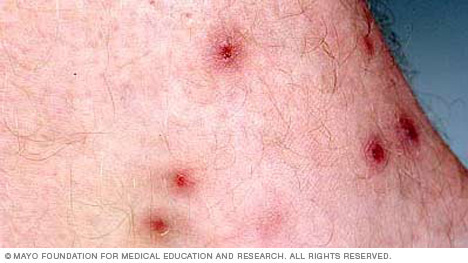
Scabbed chigger bites
Mayo Clinic
If you have immune system issues they often become huge welts that are about three to four times as big as the scabbed ones in the Mayo Clinic picture, plus they develop a nice dark ring around the affected area as the blood decides to come to the surface. I’m not showing you pictures of my summer “war” wounds. The main one I got this summer before I realized that our driveway was untreated (guess I should ask Larry more questions about his yard work) ended up bigger than the cap to my Chapstick. (Yep, I used a stick for a ruler. I have no concept of measurements when they’re in number form. *cracking up*)
All of the doctors agree that you shouldn’t scratch chigger bites due to the risk of infection. I don’t know a single person that’s ever managed to avoid doing it at least a few times, especially in their sleep. You might decide to cover the area with a bandage or even plastic wrap (no weirder than a spa treatment) after you’ve found the treatment that works for you. For me I have to live a little dangerously. I rub or scratch lightly around the raised center to make sure the larval vamp is detached, take some antihistamines, and use an analgesic. With my condition I have an issue with hyper responses and stimulations, so what should be the size of a period on a piece of paper will rapidly swell to match a quarter. Due to this I have to combat the inflammation from both sides (which is contraindicated usually, so do all of the legal stuff to keep yourself safe, because I am often noncompliant since my body never acts “normally”) and work on the inflammatory response.
Hopefully if you’re suffering from chiggers right now and that jar of Chigarid or Chiggerex Plus isn’t doing much good, you’ll give one or more of these home treatments a whirl and see if something unconventional will work for you, too. I hope you find some relief. If you’re now terrified to ever enter these areas of the States that have chiggers, at least now you know about them, how to prevent them, and some treatment options if they decide that your cell buffet is the best in town. They’re just a nuisance, so don’t let them discourage you from exploring. If you have found other home remedies that work for you or others that you know, please feel free to include them in the comments. You might just save someone else two weeks of misery!
This concludes the first weekly Whatever Wednesday post. If you have any theme requests, just let me know. I can always use some inspiration. In the meantime, happy pampering! 🙂