RSS Feed

A Little Bit About My Fur Babies

I thought I’d take a little detour and give a little glimpse into my personal life. It always slips in anyway, and I’ve mentioned my fur babies, but never given any details, so tonight I’m sharing a little about them. We have a healthy sized Dane/Lab mix (thankfully he was a runt), a male Maine Coon cat, and a female tortoiseshell cat.

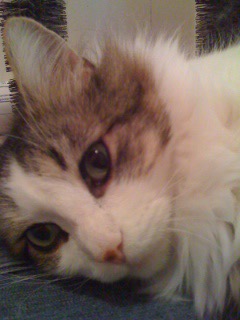
Teddy, or Theodore when he’s smacking his sister upside the head, is the Maine Coon and he is the oldest. He’s pretty independent and mostly spends his days in his hiding spots, but is a little love bug for about ten minutes per night, when he gets in bed with me. I have a ton of pictures from when he was younger (10 years old now! Wow!), but I couldn’t find my back up disc that I saved the pics to so I could free up space on my phone for an update.

IMG_0049.JPG
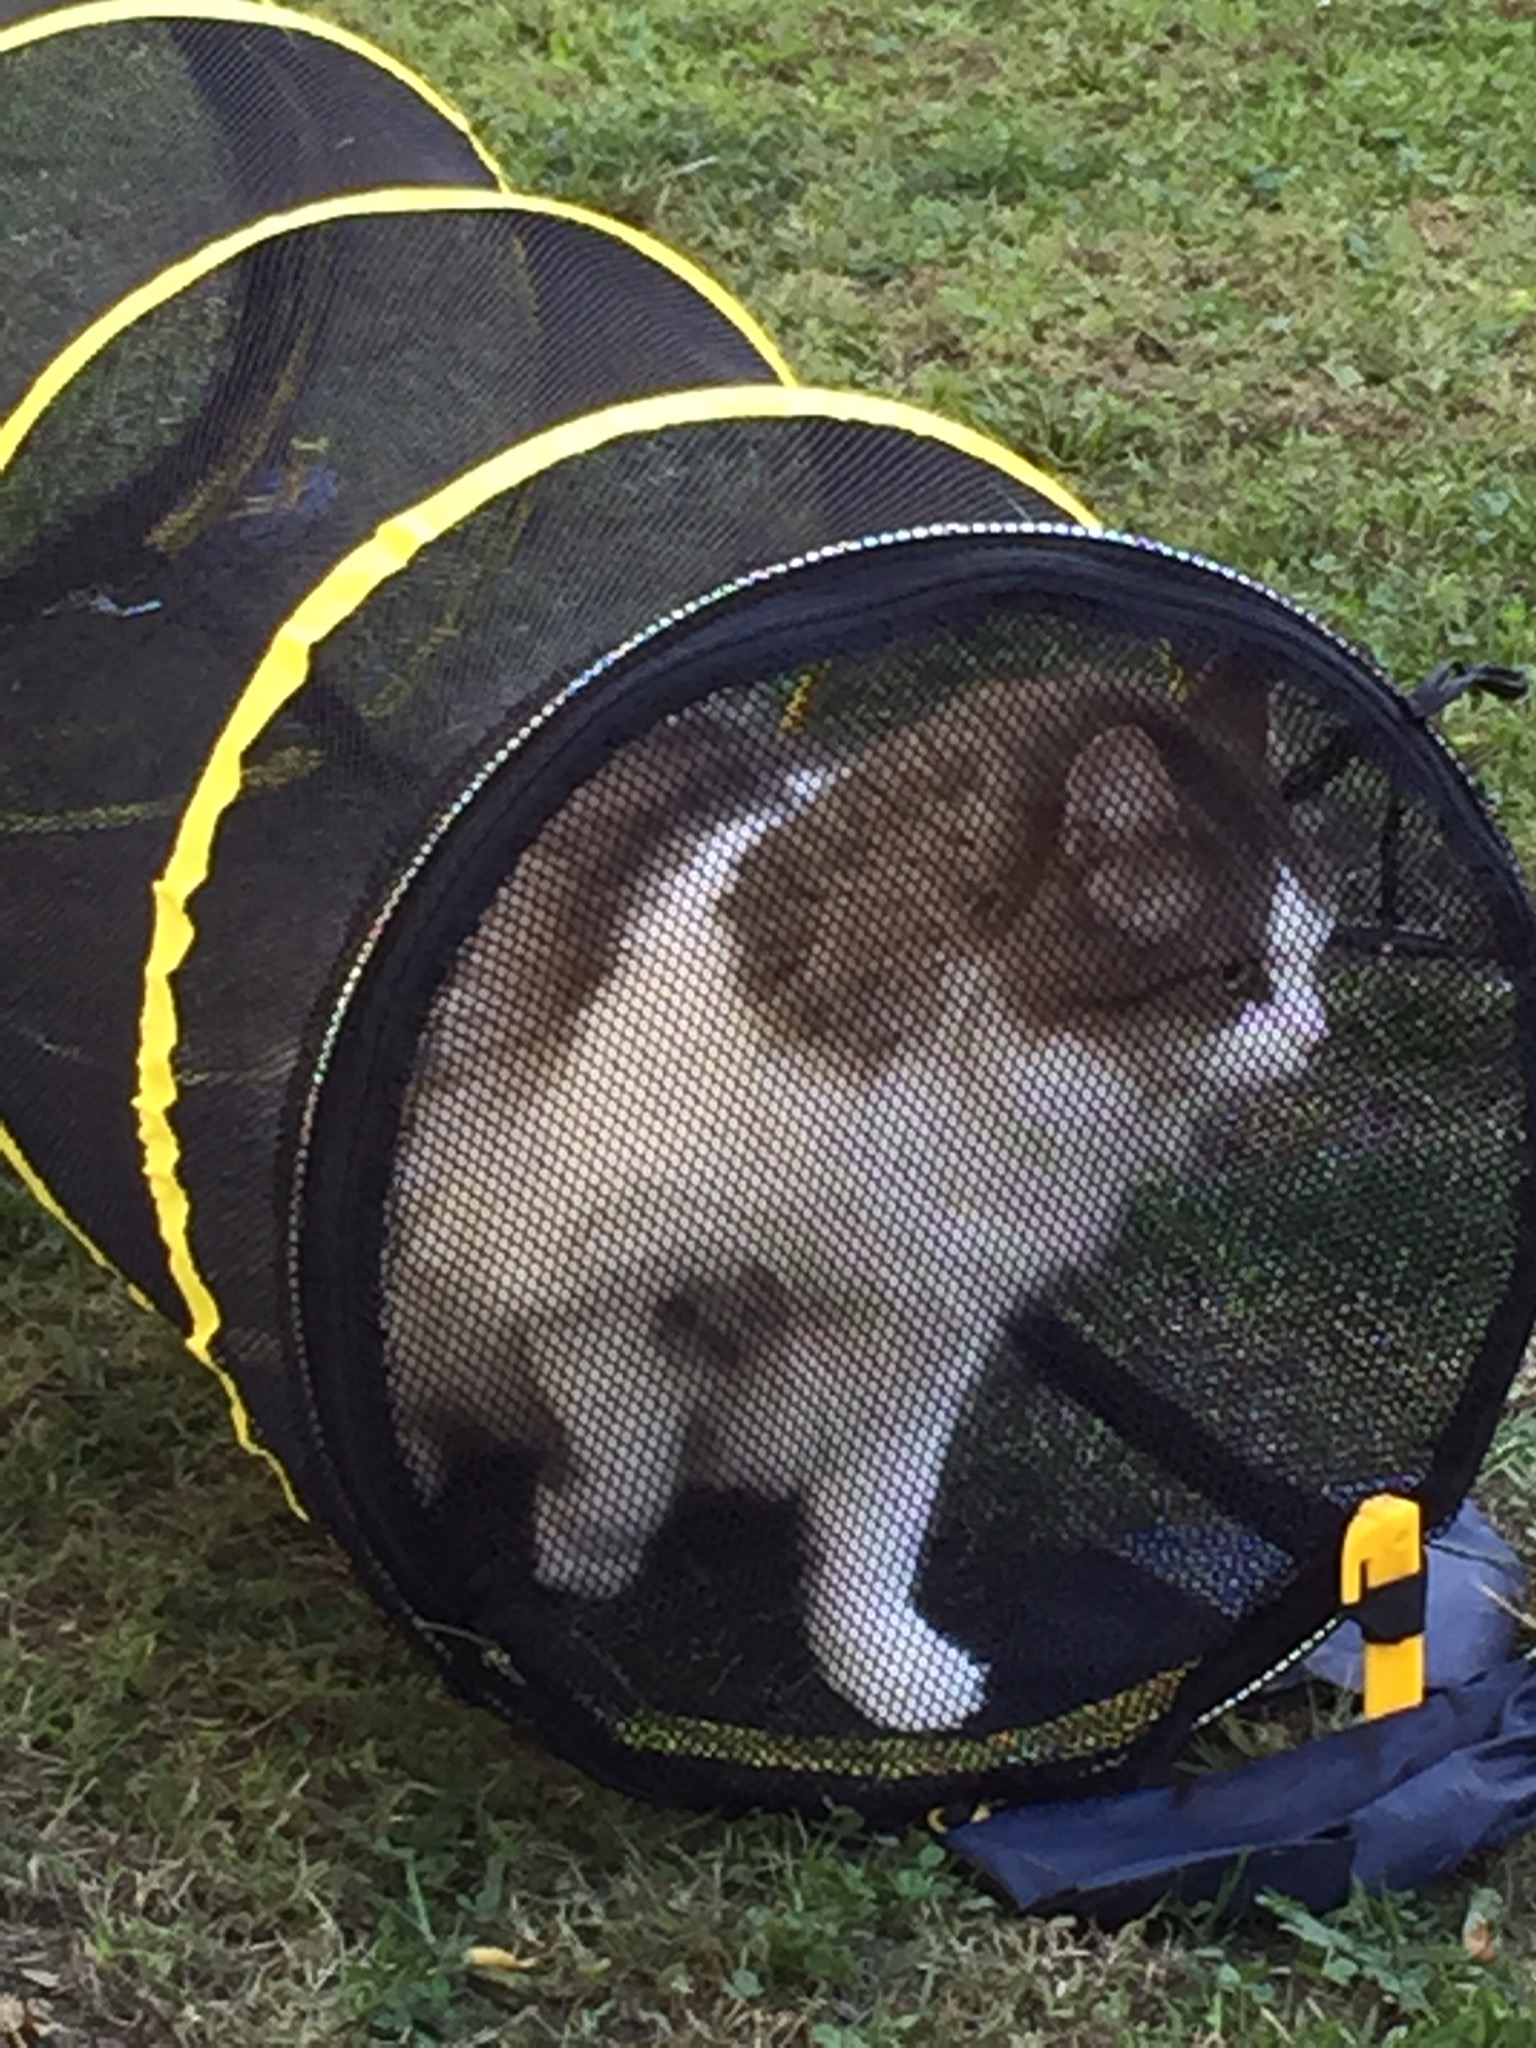
On rare occasions I can take him out to enjoy the fresh air and eat some grass, too. He yowls like I’m abusing him horribly as I take him back in, even if he’s on his leash, so the outings are less frequent, but he sure enjoys his tunnel when he goes out.

IMG_1587.JPG

The next oldest is Bo, who will always be “the puppy”. He’s a rescue dog and was found in some timber in a culvert out in the country. He was so tiny when we got him that he could curl right up on the floorboard of my Saturn. It was such a tiring day for the poor baby.

IMG_0045.JPG
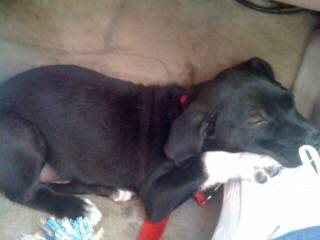
We wanted to try and get him used to water while young. He was truly asleep in the next picture and it’s one of my favorite shots of him. *grin*

IMG_0046.JPG
He’s been with us since my relapse originally began, so he’s used to my slow pace, and prefers to snuggle and sleep a lot. I figure he has to rebuild his energy because when he plays he’s like a small horse galloping and racing all around, then shaking the stuffing out of his toys, and usually knocking things over with that whip of a tail. *grin*

Bo seriously loves car rides, although he’s supposed to stick to the back seat. We took him with us when we had to drive into the city recently for some home repair items and Bo became protective enough of me that he climbed right up front. I couldn’t resist taking some pictures and then caught him at a really amusing moment.

IMG_1635.JPG
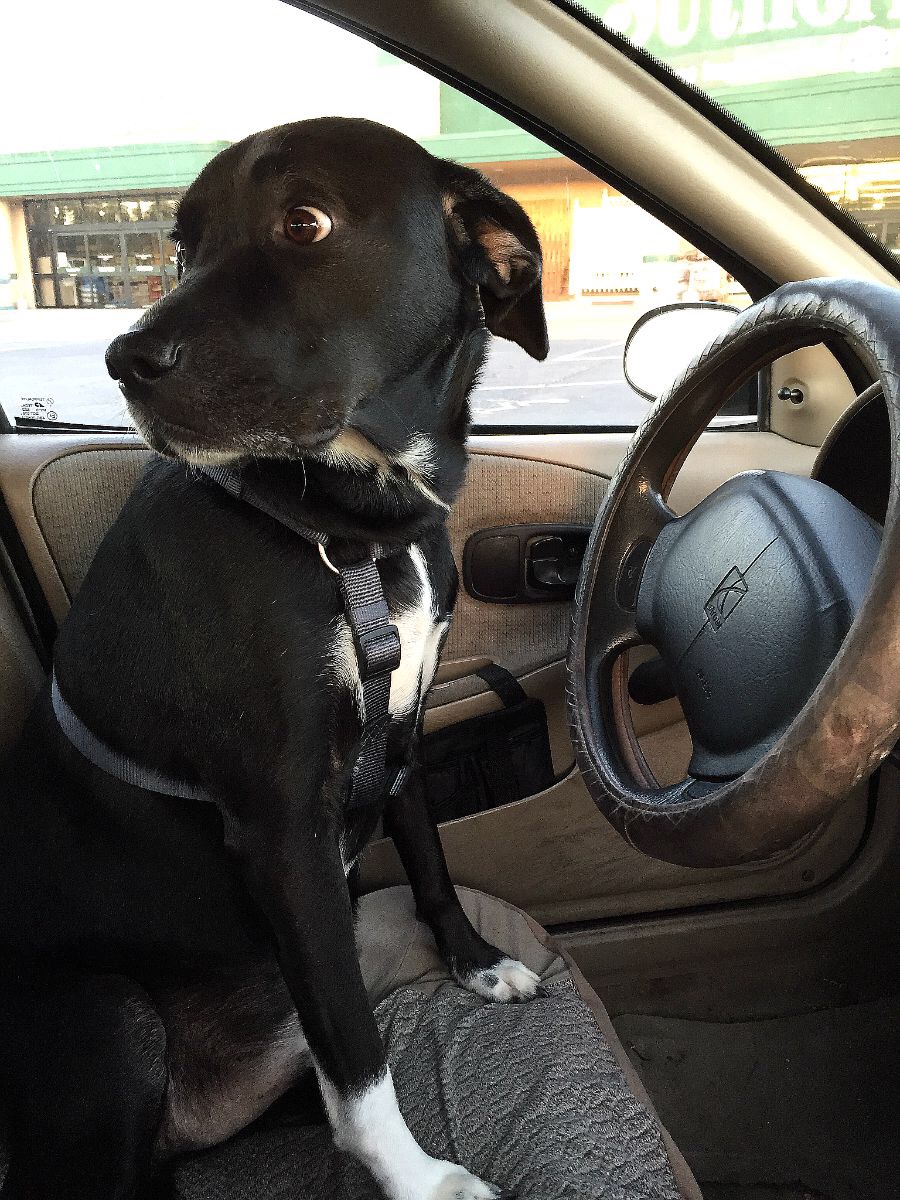
“Oh no! They found me!”

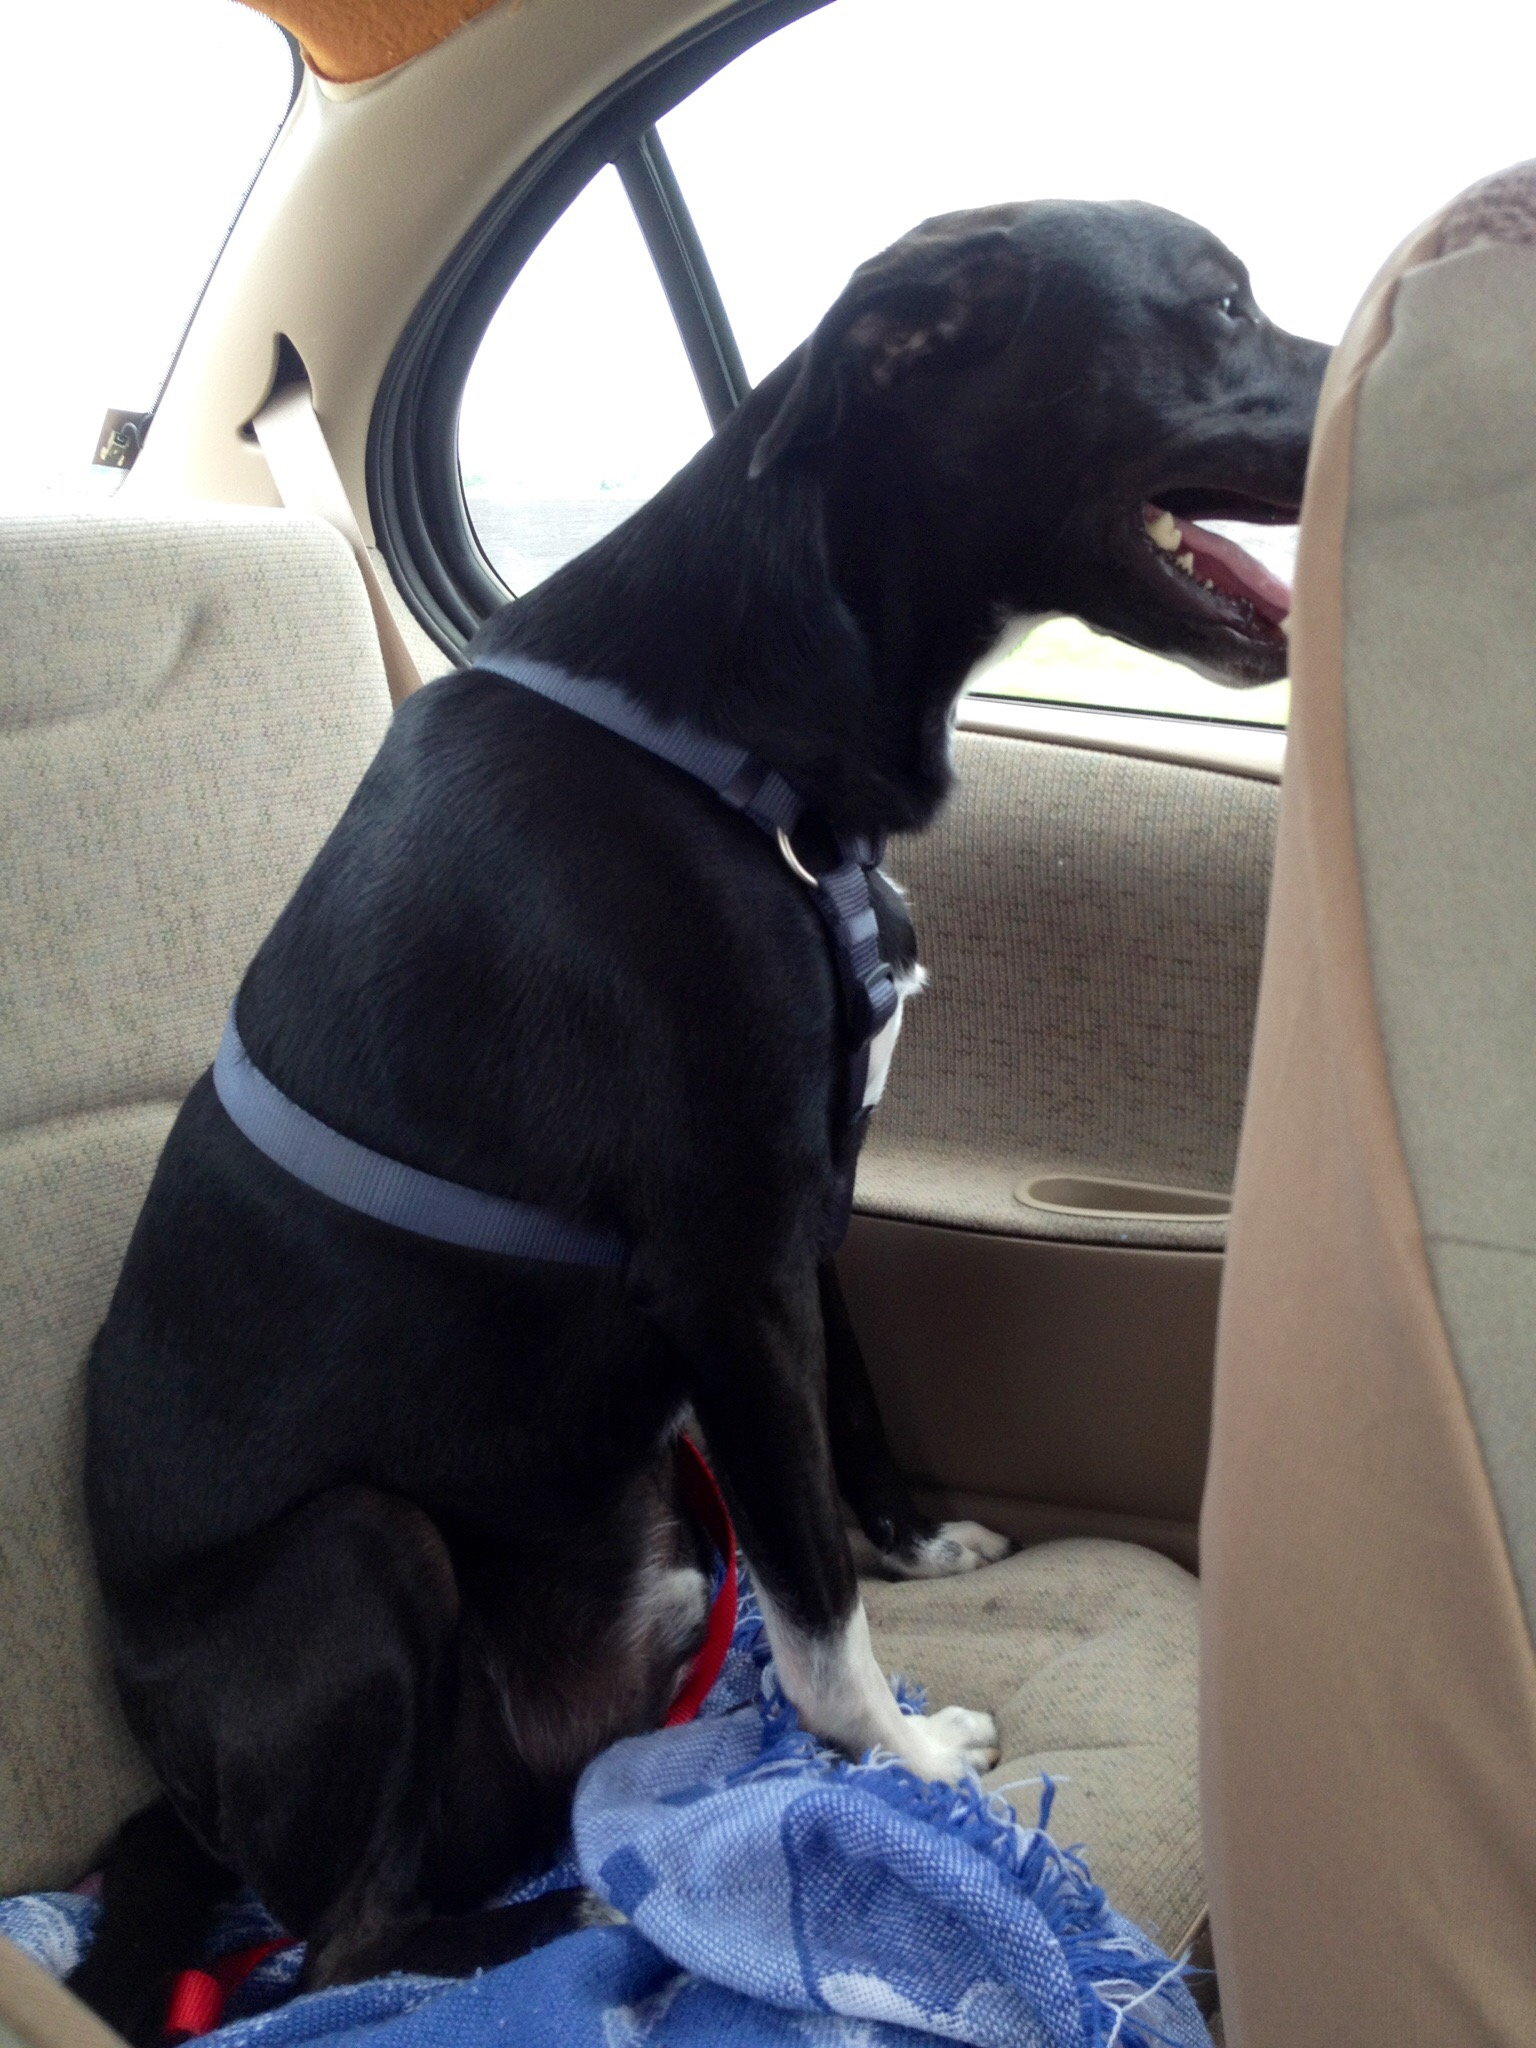
And I love this pic, too. He’s just so happy to go for a drive.

IMG_0418.JPG

He’s a big baby most of the time, but is incredibly protective of his home, me, and what he has decided is his domain, which includes a block each way around the house. Anything that he can see is his, in his mind. *laugh* Some days his sweet and playful antics are the only things that can get me out of bed, and when I’m really having a bad flare he curls up with me and tries to smother me with loving, which always stops the tears.

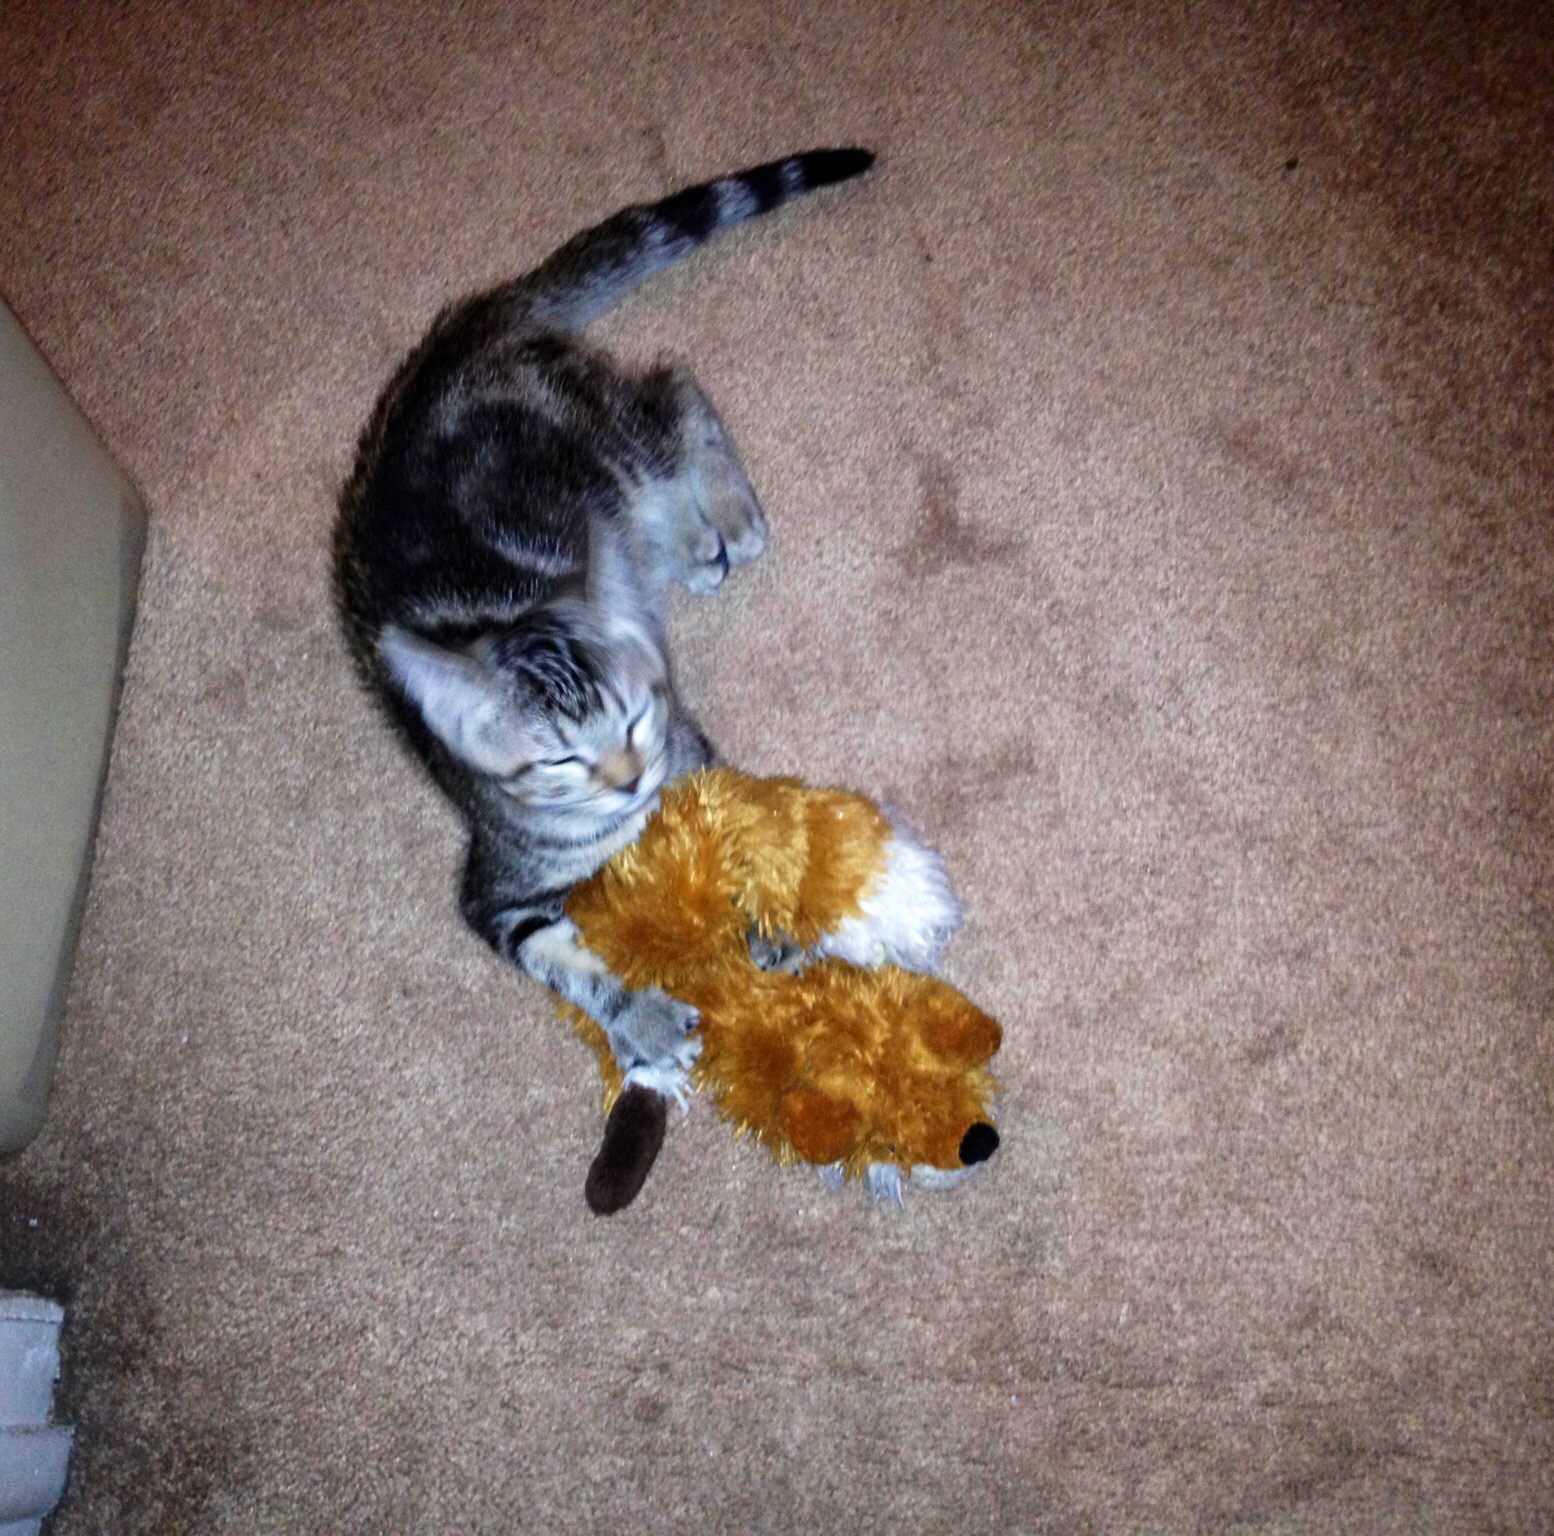
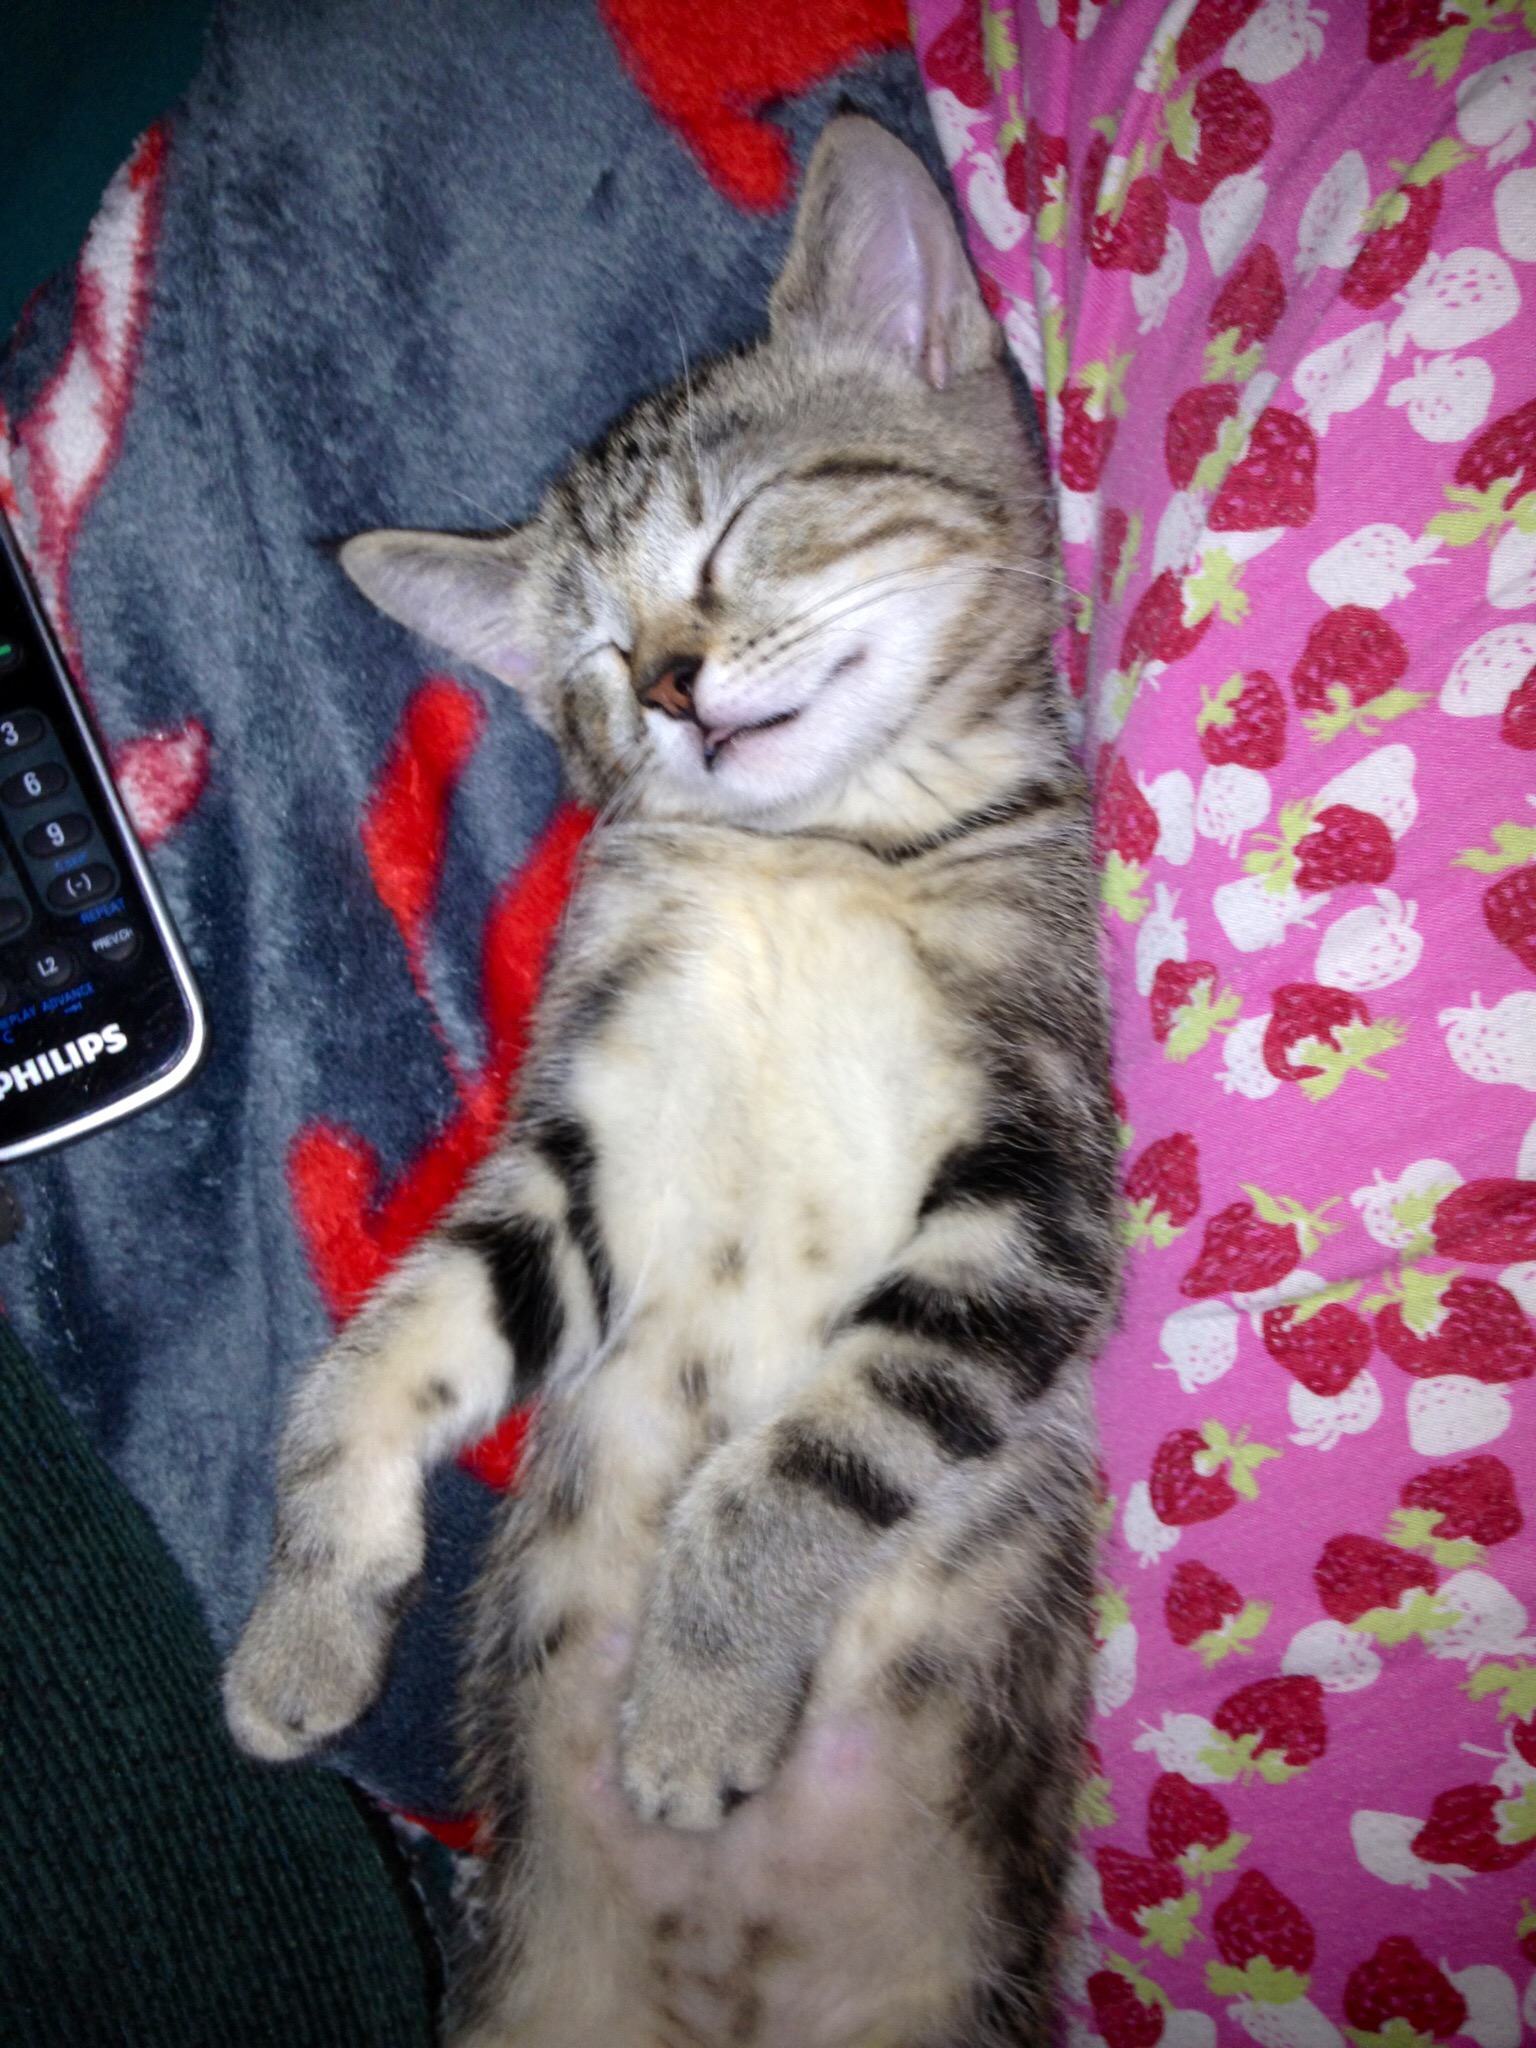
The youngest is Abby, short for Abigail. She is a little evil, I must say. We had asked for the calmest cat in the litter and ended up with a wild child that is quite a bully. She went through a phase where she kept stealing Bo’s critter toys. It was the funniest thing to see the tail of a toy suddenly disappear behind some furniture. She would drag her “kills” all over the house and it drove Bo nuts, since he’s not very good about sharing. *laugh* She always looked so proud of herself. This was one of the few times that she brought it out into the open instead of under or behind furniture.

IMG_1560.JPG

Abby is also the happiest cat I have ever had or even seen. She won’t stop purring if she’s getting attention, even at the vet’s. The vet has to turn on water to get her to pause in the purring long enough to listen with his stethoscope. Seriously. It’s wild. Abby is the cutest sleeper too.

IMG_1434.JPG

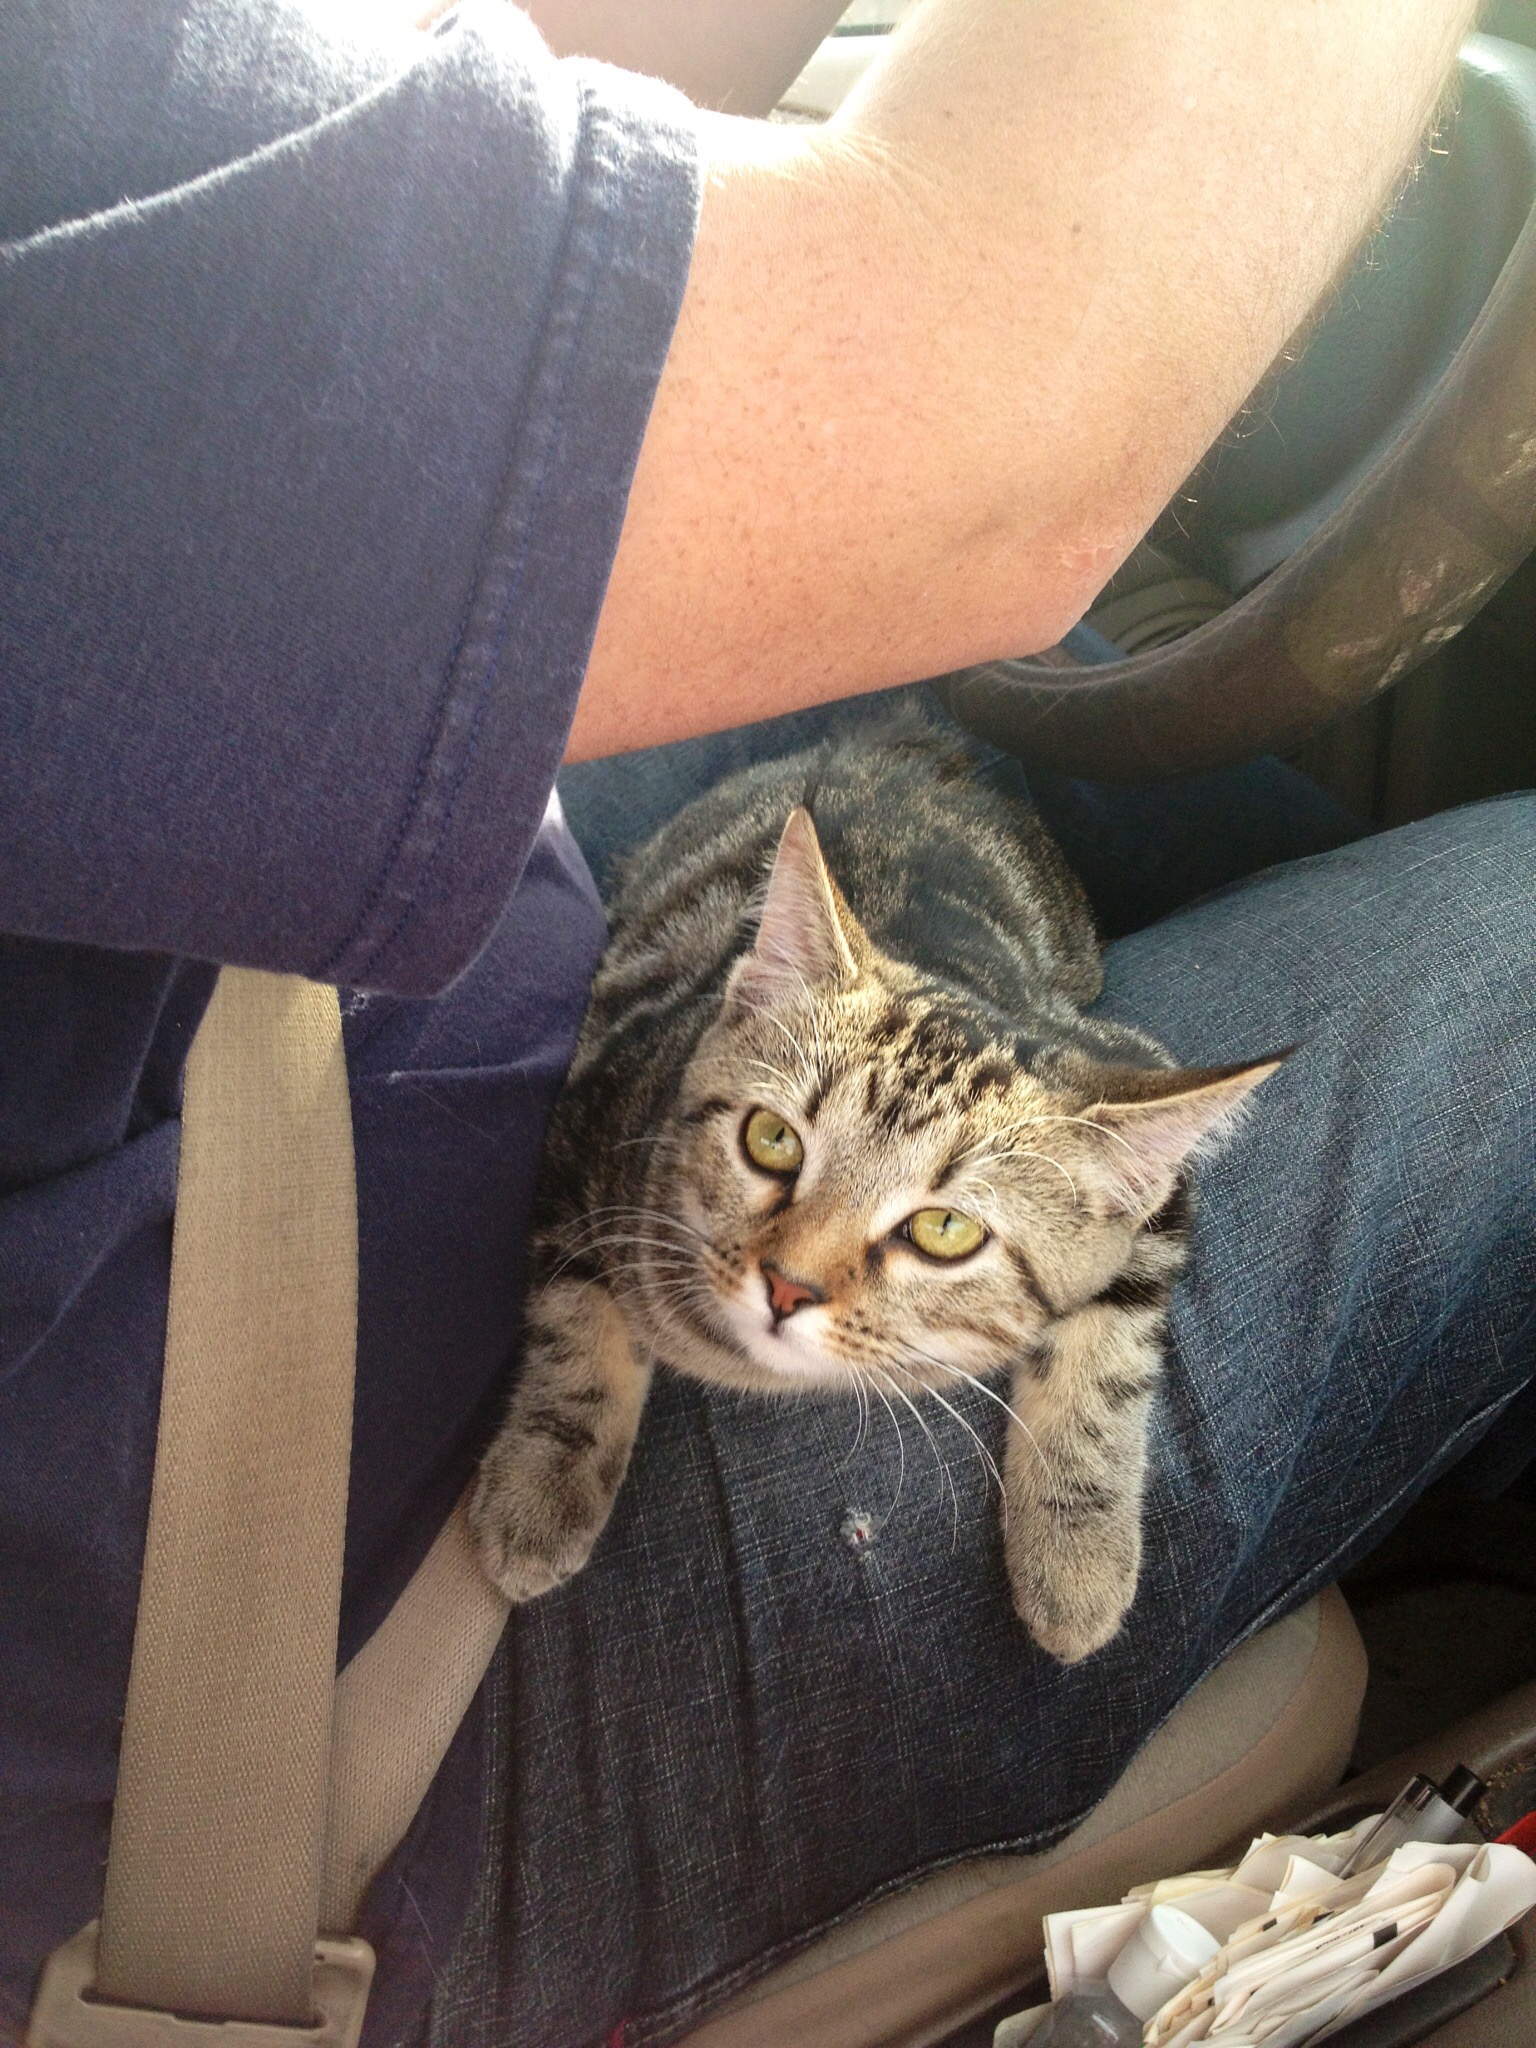
She loves car rides, too, as long as she’s able to run around. She gets put in the carrier for entering and exiting, but goes bonkers if the vehicle moves and she’s still enclosed. Ever since she was tiny she’s loved the driver’s seat for some reason.

IMG_2354.JPG

Anyway, I hope you don’t mind my taking the train down a scenic route and sharing about the “kids”. They’ve really helped me during the dark times in this relapse. We’re truly blessed to have (and had) such loving animals giving us such happy moments and I hope they brought a few smiles to you, too. 🙂

A Few Ideas

I mentioned last night that I have been percolating a few ideas, so I thought tonight I’d share (warn you). *grin*

First, as I just barely mentioned last night, I’m thinking of doing a “Scent Census”. Catchy, right?! I was watching a cooking show and they had a “soup census”, which got one hamster racing like crazy on its hamster wheel and made me start playing with the name and the idea of doing another poll. I think maybe the fun name will help tempt a few to look and click.

My favorite idea that I’m juggling around is to make a few companion pieces for the Monsters Away Spray. I’ve been thinking it’d be neat to use my herbs (no, no, I don’t live in a friendly state, so mine are literal herbs and not something that could make a person giggly or crave snacks) that are too old to use in actual bath products, but still have some aromatherapy power left. I still have quite a few bath tea bags left and I thought the herbs in a bath tea bag would work rather well as a sachet. I could use chamomile, lavender, and maybe peppermint in there. The Spray is for direct Monster fighting, whereas the sachet would be to help keep those monsters repelled or to help keep them away from the bed when slipped under the pillow. *grin* Maybe even a cute little bag that the two products will fit into for easy gift giving, too. Plus, I have rethought the idea of how to actually promote the spray. Nobody felt their kid would be into a little amateur acting to get a marketing picture taken when I had debated a silly handmade monster head or even a costume mask, but I’ve been thinking maybe a simpler and truly realistic picture would work. The closet door is open in the background, the darkness deep and completing obscuring the items inside the closet. A child is in the forefront pointing at the closet and you see an adult’s hand at the other edge of the picture reaching out and spraying some Monsters Away Spray at the invisible closet monster that their little one is certain is there when the lights are out. Or maybe even under the bed, if it was dark enough to be believable, yet light enough in the room to actually get a good shot. Most likely anything involving a kid is going to be massively more interesting than a picture of the bottle. Lol.

To round off this post I thought I’d also mention that I’m playing with the idea of soap “cake” slices again for Christmas, although probably not for combos this time. I was thinking of using the Lime Margarita FO and making a bright green soap cake and piping white soap frosting onto it. Maybe do a Christmas Cake that looks more like a poke cake or fruit cake, with diced brightly dyed clear pieces embedded within a chocolaty cake, so you see the pretty squares all along the sides and as you wear it down washing. That one may look a lot better in my mind than it could ever be in reality though. *laugh* A red velvet soap cake is another idea. I bought some Americana red soap colorant bars the last time I did a big order and I bet that would give a nice rich dark color when used with a tiny sliver of black colorant too. Pipe on some white or off white soap frosting on it, too, of course, unless I get creative with a middle layer and can’t figure out how to cost effectively package a slice with that frosting on it.

If you think something sounds like a fun idea and maybe the next great seller for this Christmas, please don’t hesitate to comment. In the meantime pamper on, Garth. 🙂

National Blog Posting Month

Hold onto your hats because I’m going to try the NaBloPoMo (National Blog Posting Month) challenge. The goal is to try to write a post every single day for the month. There isn’t a theme and it can be totally random stuff – it’s just to help get into the habit of posting often. I admit that I create tons of posts that never get typed or written down. It’s become a bad habit and this challenge came at a good time to train myself to do a better job with the blog. You’re forewarned. A peek into my daily mind can be frightening and it’s definitely not for those that prefer a direct path. *laugh* A wonderful side effect to my illness is that the hamster wheel in my mind seldom ever stops going and more often than not there’s more than one wheel swirling. One of my best friends is really awesome at being able to hold conversations with me with multiple topics going at the same time (thank you for that Ma’am! It’s one of the few times I can let loose.). Very few people have this ability and it can be overwhelming. I’m being super honest and feeling a bit nekkid talking about it, since many people have made unflattering comments about how difficult it is to follow my train of thought or my habit of juggling several topics. Self censoring will stop for thirty days. Prepare yourself to travel down some unpredictable, amusing, and sometimes downright odd paths for the next month. *grin*

First up is actually business related. Today I took down a lot of scents from my website. I worked on inventory a few weeks ago, but put the last of it on hold while my aunt was visiting from The Sunshine State, and I finally took the plunge and finished it up. I had some expired FOs and EOs, but mostly it was just scents that no one ever expressed an interest in. It’s rather odd how attached I can get to these silly scents. I learned an interesting life lesson while doing inventory, too. When Citronella turns it has the ability to make you gag until you nearly vomit, just from a little whiff. Impressive. I kind of wonder if maybe that’s what it’s like for mosquitos. Maybe instead of being a repellant it’s actually just rancid to them and they fly off to puke their brains out. Serves the little (okay censoring that) right…Anyway, lesson learned. I’ll get some more next Spring, but for now, it’s removed from my site because I have no desire to smell it for a long time. Lol.

I’m debating trying another poll (maybe I’ll actually get a few participants this round *grin*) to see what FOs to keep around that haven’t sold but are still good. I couldn’t bring myself to nix all of the non sellers, because some smell so good. Plus, polls are fun IMO.

I have some ideas I’m stewing on for products to offer for the holidays, but I figure I better save some stuff for later in the ninth, so there is more than one post that’s actually business related. In light of that I’m signing off for the night, so happy pampering and you’ll hear from me again in a few hours. 😉

Big Changes

I’m excited to announce some big changes to my little bath and body business. If you haven’t noticed from my header I’ve changed from Georgia’s Bath Products to Georgia’s Pampering. I also have a new website address! It is now www.georgiaspampering.com and is now hosted together with this blog. I am so tickled to have the two hosted together finally. I didn’t plan on changing names, but I believe a fresh reopening is a great idea.

My original website expired in August, and I wanted to bring the website over to WordPress, but I needed to wait until the end of September for my domain to expire. Sadly the website host renewed the name themselves and I didn’t want to be involved with them anymore, yet didn’t want to keep waiting to see if they would relinquish the domain, so I decided to change everything up.

Although the name change is going to mean a little extra work and, worst of all, some extra costs since I have to do new business cards and banners, I think it worked out for the best. I like that it fits my theme (pampering with natural benefits) and is a little more accurate, since I ventured more into body products after the first few months.

I haven’t decided if I’m going to get another email address to reflect the new name and have the old one redirected. I’m honestly not so sure it’s that big of a deal. The website is an easy to remember name, so people can always go through that to contact me. If anyone would like to put in their two cents I appreciate the input!

I’ll be tweaking the new site for some time to come and will put new products up within a month, hopefully. I’ve had some new medical challenges and injuries to deal with, let alone the pressure I put on myself to get my new site live (not to mention the incredible pressure of picking a new name!), so I’ve only made a few of my standard lotions lately. I’ve been writing up some ideas though, so cross your fingers that I can start working on them, please! *grin* I’m eager to try some new twists.

I hope you like the new site. If you have any troubles with it or would even like to provide feedback, please don’t hesitate to do so. It’s near and dear to me, but I want this to be a much easier site to navigate (although I can’t afford to have an online cart sadly). In the meantime, I wish you a wonderful week and happy pampering. 🙂

Beef Sundaes

In honor of Serve It Sunday I thought I’d go with a savory twist on a sundae.  Now, before you wrinkle your nose and think I’ve gone completely off my rocker, it’s just called that because it’s layered much like a dessert sundae would be.  If you’re familiar with the KFC Chicken Bowls, then this recipe will remind you a lot of them, except this is kind of the hot beefcake cousin of that.  *grin*  This recipe has several names and variations in the Midwest and they’re even served at some fairs, so there’s a good chance that some of you will be familiar with these.  The best part is that we found some shortcuts to make this meal super quick and easy, so we can have a hot meal even on my really bad days when it’s a struggle just to get out of bed.  If you’re one of those people that likes to make everything from scratch, look away now.  *laugh*  This recipe is for those people that watch Sandra Lee’s Semi-Homemade.  😉

See, I told you it was savory

See, I told you it was savory

Are you still with me now that you’ve seen that it truly is a savory dish?  *smile*  You’re going to put a scoop or two of mashed potatoes in the bottom of the bowl, sprinkle some corn over that along with some shredded cheddar cheese, and pour some hot topping (gravy) with roast beef right over the top.  Some people add a small cherry tomato on top to complete the whole sundae thing, but I prefer to not mess with this flavor combination.  *laugh*  We take several shortcuts with this meal.  We make instant mashed potatoes to make this super quick, start with a packaged gravy mix, warm up a bag of freezer steamer corn, and even use thick cut lunch meat.  You can make less dishes for yourself if you use packaged shredded cheddar instead of shredding it yourself, too.

So, start your gravy and your mashed potatoes.  I’m not going to post any pictures of making the potatoes since there’s nothing interesting about that, other than for the two of us (one picky eater and one country boy) plus some leftovers we followed the 3-4 servings instructions.  I am going to put a few of the gravy, though, since I found out that some people have never used a gravy mix before.  We love McCormick’s Brown Gravy Mix so much that I buy it in bulk.

Start that Good Brown Gravy

Start that Good Brown Gravy

Any country fans out there?  Do you have “Good Brown Gravy” in your head now?  lol  Anyway…I wanted to make 3 cups of gravy, so I used 9 tablespoons of McCormick’s Brown Gravy Mix (if you’re using the packets I’d follow the instructions on there and make two packets worth), and added a tiny bit of water to the powdered mix.  I whisked it until it created a paste and then slowly whisked in the remaining 2 1/4 cups of hot water.  Creating the paste and then slowly whisking in the remaining water will ensure that you have a smooth gravy.

After whisking water into the paste

After whisking water into the paste

We then chopped up some leftover thick cut roast beef lunch meat, which was then added into the gravy, and simmered the combo to warm the meat up.

Chopped Roast Beef Lunch Meat

Chopped Roast Beef Lunch Meat

Add Meat to the Gravy

Add Meat to the Gravy

While the meat simmered in a delicious bath I steamed a frozen bag of super sweet corn and drained it.  Once the corn and meat are warmed up, it’s time to build your beef sundae.

IMG_1211 IMG_1212

Pour the meat sauce over and dig in!  I don’t add salt since the gravy mix has a sodium kick to it all ready, but the big guy likes to add salt and pepper to his.  The last key tidbit I’ll give is that you have to try and get all of the layers in each bite for the best flavor profile.

Mmm Hot Beef Sundae

Mmm Hot Beef Sundae

The cheese melts into that meat and gravy, then there’s the creamy mashed potato, and a bright pop of sweet corn…a delightful bite and a super easy meal!  I hope you give this recipe a try and enjoy it.  Although I’m obsessed with this flavor combo you can totally change this up so easily to fit the interests of your family.  This is a great dish to sneak in a bit of veggies into, by the way.  *grin*  I wish you a wonderful week and happy pampering.  🙂

Beef Sundae Recipe

Makes about 3 not-overly-healthy sized portions 🙂

3-4 servings of instant mashed potatoes, prepared per package instructions (which calls for water, milk, margarine, and salt)

9 tbsp. McCormick Brown Gravy Mix

2 1/4 cups of hot water

Leftover roast beef lunch meat (I use about 3 cups worth)

One bag of frozen steamer super sweet corn, steamed and drained

1/4 cup shredded cheddar cheese, to taste

Whisk a tiny bit of water into the gravy mix until it creates a thick paste.  Whisk in remaining hot water and bring to a boil over medium heat while stirring frequently.  Reduce the heat and simmer about 3 minutes.

While gravy is simmering prepare the instant mashed potatoes per package instructions.  Chop leftover roast beef lunch meat into bite sized pieces and add to the gravy after it has simmered.  Continue to simmer the gravy combo until the meat is warmed through (about 3-5 minutes usually).

While gravy is finishing steam and drain the corn.

Once the hot ingredients are all heated through build each sundae in a heat resistant bowl, starting with a scoop (or three, per preference) of mashed potatoes.  Sprinkle a handful of shredded cheese and about a quarter cup of corn over the potatoes.  Ladle the gravy and meat mixture over the top.  Add salt and pepper to taste, optional.  Enjoy!

An Easy Beef Soup

Hi there!  I’ve been a little preoccupied with some medical issues, but I figured I’d get back into the swing of things with an easy recipe.  This is one of those one pot dump soups that utilizes canned items and leftover steak.  Living in the Midwest we have quite a bit of steak or even some grilled flank steak for fajitas that works perfectly in this soup.  You could always cook some bite sized stew meat, too, of course.  I wish I could put this recipe in that handy print format for you, but I have no clue how to do that with this blog.  lol I’ll write up the recipe below the main part, so it’s easier for you to copy and paste.

In a soup pot dump one can of yellow corn with juices (sometimes I even use a steamer bag of frozen sweet corn if I don’t have canned or if I want a little sweeter corn), a can of green beans with juices, and a can of stewed or diced tomatoes.

Beef Soup Beginning

Beef Soup Beginning

Add 2-4 cups of water (you’ll have to play with this recipe to see what your family prefers.  I like mine in between, so I go with three cups), 2-4 beef bouillon cubes (equal to the amount of water you use), and then fill one of your empty veggie cans with instant white rice and add that.  Didn’t expect that, right? *grin*  Add a dash of salt (optional, I tend to add about a teaspoon, although when I’m watching my sodium intake I don’t add any and I use no sodium canned veg too) and about a teaspoon of garlic powder, to taste.  You could add a bit of pepper, too, but I have a sensitivity to pepper, so I just set out the pepper for individuals to season their own bowl to taste.  By the way, you can totally use beef broth instead of the water and bouillon.  I usually have bouillon on hand, though, and have gotten to where I prefer the taste of it this way.

Beef Soup ingredients 2

Beef Soup ingredients 2

Next add your meat.  I had a baggie of leftover flank steak from fajitas, which I dumped right on top and then mixed it all together.

Beef Soup 3

Beef Soup 3

Put the lid on the pot and bring to a low boil on medium.  Once a boil has been reached lower the heat and simmer for 30-45 minutes.  This time frame is so variable because it all depends on the rice.  At 30 minutes try your rice and see if it’s tender.  If it is, then it’s time to dish up!  I’ve noticed that sometimes in the winter when the house is cooler that it can take about 40 minutes.  Here’s how your soup should look when it’s ready.

Easy Beef Soup

Easy Beef Soup

It is so yummy and filling, perfect for a cool day and a great tasting way to get some veggies into your family’s diet (what can I say, I was a very picky eater when I was a kid and my mom started making this *grin*).  One thing that I want to warn you about so you don’t think you’ve done something wrong is that the rice will soak up most of the liquids after it sits a bit.  If you want to have a wetter soup, then add more broth/water and bouillon.  The rice is so plump and juicy from absorbing the broth that I kind of like it when it gets thick.  Here’s what it’ll start to look like.

Beef Soup 5

Beef Soup 5

I just don’t want anyone to worry when they go back for seconds or to warm up leftovers.  Make sure you don’t drain your tomatoes or veggies, though, in order to get the right flavor.

Well, there you have it.  Our secret to a hearty meal with minimal work.  *grin*  Below is the recipe itself for your convenience.  I hope you have a wonderful weekend and happy pampering!

Easy Beef Soup

Makes…plenty of servings? lol I have no clue.

Ingredients:

1 can of green beans, not drained

1 can of yellow corn, not drained (or one bag of frozen steamer sweet corn, with juices)

1 can of stewed or diced tomatoes

1 can of instant white rice (just use one of the empty veggie cans, so no measuring cups to wash!)

2-4 cups of water (to preference)

2-4 beef bouillon (equal to cups of water used)

1 tsp garlic powder, to taste

1 tsp salt, to taste, optional

Leftover steak or diced stew meat (about a cup, but it’s to preference)

Put all ingredients into a soup pot, mix, and cover with a lid.  Bring to a low boil over medium heat, then reduce and simmer 30-45 minutes until rice is tender.

Freezer Space

I thought I’d share a little tip today that’s been a huge help after we binge shop at Sam’s Club. Have you ever bought that big package of hamburger there, or at Costco, because you realized how much cheaper per pound it was than you’ve been paying at the regular grocery store, but then start to hate all of that ground beef because it’s taken up half of your freezer? Could just be a quirk of mine, but the tip works, so I’m still sharing it. Figure out your own situation that it might apply in. *teasing grin*

We actually bought a smaller bulk package of lean ground beef this time, but fitting over five pounds of it into my freezer while I still have leftover buckets of ice cream from the 4th of July was still going to be a challenge. If you think about how you’re packaging your meat before you freeze it, you can get it all to fit so easily and it’ll make you look like the new Martha Stewart. Who doesn’t want to look all organized and on top of everything?!

Instead of taking a handful of the meat, dropping it into your bag, pushing all the air out, and zipping it up, you’ll want to take one more little step. Just flatten the meat out. Seriously. Yeah, I smacked myself in the forehead over that too. *grin* If you gently push the meat into the corners (hey, if you’re having a rough day you can even slap it around a bit, no harm no foul, just don’t break the bag) and try to get the whole package pretty level, and then zip, this is how nice they can look.

20140730-230901-83341197.jpg

The best part is that you can stack your packages and you’ll be able to actually get more food in your freezer, since you’re not having to try to play food Tetris or balance things so no one gets knocked out by a frozen meatloaf when they open the freezer door. You can easily see what you have and they freeze so much faster, so then you can stand them up, stack them on top of the tater tots, or whatever. So simple and so incredibly handy!

20140730-231248-83568920.jpg

(Sorry about mottled pictures, by the way. All of the packages at the store had gotten a little air. Please don’t worry though, the meat was fine. Larry used to be a butcher, so if he says it’s just affecting the looks, then it’s true. One of the few times I’ll admit to him being right about something…*laugh*)

I find myself putting cooked leftovers into bags like this too. Apparently it just becomes a habit. I let my fried ground beef cool a bit, spoon it into a zip bag, get it all flat, and stack my leftovers. Lol. Our freezer looks like a card catalog sometimes. I start flipping through frozen cards of meat trying to decide what meals to plan. *grin* This works great for shredded (cooked) chicken and beef, too. I also have a few “cards” of frozen watermelon and even bell pepper, too. (There are a few steps to freezing bell pepper, so please research before you try it. It’s seriously handy when you don’t live in the city though and can’t just pop in to a grocery store or market for a pepper!) Another great benefit to packaging this way, I massively cut back on the amount of freezer burn we would find. We all know I’m too prone to bad luck to think I suddenly developed a knack for handling foods (I mean, don’t you remember when I had whipped soap on my glasses and in my hair, or the lotion that splattered the wall?! *laugh*). Mostly it’s because you won’t have much air in that package to expose the meat. I think it also has to do with the fact that there aren’t any mystery meats anymore, so you’ll use it before it can go bad. When they’re packaged flat it’s easy to see what in the world it is, because you won’t have crystals or warm air splotches on the bag from breathing heavily because you’re juggling that frozen meatloaf on top of the round ice cream carton, while the Popsicles are trying to dive bomb onto your shoulder. 🙂

Hopefully you’ll give this simple tip a try (and hopefully it helps you as much as it has us, of course). If you have any other freezer tips, I’d love to hear them. Happy pampering!

Serve It Sundays – Three Envelope Roast

Did you know that it’s quite easy to torture a nerd? Just take away their wifi. *grin* My modem died days back and I’ve been kicking it 4G in the meantime. It’s amazing how much housework and crocheting gets done when I can’t access SL, Amazon Prime, or my games. Pinterest only works part of the time without the wifi, so I’ve been rather productive. Lol. However, that also means that when I want to blog I have to try and do it through my phone, which has become a bit awkward now. The laptop is a little bit easier for me now, so a few potential posts have been put off until I’m running on full service again. *grin*

In the meantime, I wanted to share a super easy recipe I have been using. I found it on Pinterest, although it hails from www.plainchicken.com originally. If you follow me on Pinterest you’ll find the pin, plus my notes about it and the direct link, on my Successful Pins board.

First off, start with a 3-4 pound bottom round roast (although I’ve done a 4.5 lb. with an extra half hour of cooking and it was still perfect). Trim what you can and put it in your crockpot. In a measuring bowl combine one cup of water, one cup of salsa, one envelope of Italian Dressing powder mix, one envelope of onion soup mix, and one packet of Au Jus mix. (Now, after my first by the book try, I’ve changed out the salsa for an additional cup of water and two beef bullion cubes. I like the flavor and texture better, but this goes to show how easy it is to tailor this recipe to your preferences.) Once you whisk everything together pour the mixture over the roast, cover it, and cook the roast in your crockpot for 8-10 on low. Maybe my roasts are always a bit stubborn, but 10 hours is my sweet spot for some reason, with 10.5 hours for a 4.5 pound roast. You know it’s ready when you can shred it with your fork (or when you try to lift it with your tongs and it falls apart lol).

Now, you can ladle your broth mixture into a saucepan and thicken it into gravy if you’d like, but honestly we love to pour it as is right over some hot rice, and then nibble the roast. If there is any broth left over after our second meal, I keep it and use it over mashed potatoes or we soak it up with some biscuits. It is sooo tasty! The one thing I really want to caution against is adding salt. It’s tempting, since most crockpot meals tend to be a bit bland, but with the packets (and especially if you use bullion), there’s quite a bit of sodium all ready.

The original recipe states that they use the shredded meat on sandwiches, but ours never makes it that far. Truth be told there’s always a chunk missing before dinner time anyway because the last two hours of smelling it throughout the house is pure torture and no one can see me attack it like a rabid bear. *grin*

Here’s a quick look at the yummy dinner. Please forgive me, but the rice and broth were irresistible, so it doesn’t look quite as nice as it did. *grin*

20140727-212259-76979917.jpg

I hope you enjoy it as much as we do. The best part is that it’s so easy that you can make it a go to when you know it’ll be a busy day. There’s maybe 5 minutes of fuss, and that’s if you have a lot of trimming. 🙂 Now that’s something to cheer about!

Serve It Sundays

Serve It Sundays

Until I get a little bit more into business stuff again I’ve decided to add another weekly theme.  Serve It Sundays will feature a recipe that is tried and true.  The first one is super decadent and looks incredible, so it’ll really wow everyone if you have company over.


I’ve had a really awesome friend since childhood named Leah and the friendship has gotten even better in our thirties.  The neat thing is that we have massively different talents and abilities.  One of her abilities and interests is cooking/baking.  This gal can whip up a buffet for twenty people without batting an eye while sometimes Larry is lucky if he doesn’t have to heat his food himself.  lol  I always love seeing pictures of her latest successes and when she showed me the Reese’s Peanut Butter Cheesecake I was in total awe.  What better way to start off this theme than showing you a total show stopper! 


First, credit where credit is due.  Head over to the Taste and Tell Blog for the recipe, and maybe find yourself a new blog to follow.  This blogger has some really neat stuff on her blog.  There’s no way I could do justice to her great post by writing any of it here, so make sure to take the link.  I have it pinned under my Desserts! Yum! board on Pinterest, as well, although the link won’t get you far.  I just used the name on the picture to get to the site, so I could get a printable copy.  *smile*


Now is the time to make you drool.  These are the pictures of Leah’s amazing cheesecake, so these are what you can do at home.  No photoshop, no fancy lighting, just amazing yumminess.  Make sure to keep looking after the pics, because I’ll have notes that Leah provided about the process and possible changes to try.


Reese's Peanut Butter Cheesecake 1

Reese’s Peanut Butter Cheesecake 1


Insanely mouthwatering, right?!  Just wait until you see the close up…

Close up Reese's Peanut Butter Cheesecake

Close up Reese’s Peanut Butter Cheesecake


If you love Reese’s cups you will love the bird’s eye shot, too!

Reese's Peanut Butter Cheesecake 2

Reese’s Peanut Butter Cheesecake 2


Are you moaning from how good it looks or because your mouth is watering?  This next pic won’t help. *grin*

Reese's Peanut Butter Cheesecake 3

Reese’s Peanut Butter Cheesecake 3


The final bit of torture…

A slice of Reese's Peanut Butter Cheesecake

A slice of Reese’s Peanut Butter Cheesecake


As soon as I saw the first picture I told her I wanted to feature it on my blog someday and thankfully she agreed.  *smile*  I’m still in awe that you don’t have to be a professional to make such a stunning cake!  She had a few notes to keep in mind from her experience.  First, she made it as directed in the recipe and although her whole family loved it, she is planning on making a few changes.  She will omit the Reese’s Minis from the top, because although they look cute, they made it difficult to cut and didn’t add anything to the flavor of the cheesecake as a whole.  In addition, she will try cutting 8 ounces of the cream cheese out, explained here: “It’s a very, very tall cheesecake and I think cutting out some of the cream cheese would help a little without altering the flavor too much”.  This gives you a little extra info to keep in mind when you try making this yourself.  If you try this I’d love to hear from you! 


In the meantime, I wish you a wonderful week and happy pampering! 🙂

Keeping It Green

Before you go and think this is going to be one of those boring PSAs about environmental stuff, I want to assure you that it’s far from it.  I love to research, but fall asleep with that topic, so never fear.  What I’m actually talking about is your leafy greens!  Do you ever go to make a salad and get seriously irritated that it resembles a slimy swamp?  I have found a method that keeps those greens looking (and tasting) good for a bit longer.


Larry likes to have a salad for his “lunch” (in quotes because it’s usually eaten at night) on workdays, but we only get groceries once a week, since we live in a rural area.  Those last few days of his work week often left me scrambling to figure out something else to make for his lunch, because the second package of lettuce wasn’t so appetizing anymore.  I figured that someone else must have trouble with this too and figured if the info is anywhere, then it’s on Pinterest.  I sifted through a lot of pins, but finally saw one that was super easy to test and wouldn’t require any special tools.  Over at PopSugar they wrote that you can get several more days out of your leafy greens (even some green herbs!) if you dry them well, put them in a zipper bag, and blog them full of air.  I was pretty skeptical, but Larry’s always saying I’m full of hot air, so I figured I was set to try this. 


Now, I’ve tried prepackaged salad and fresh romaine leaves.  Since I can get a lot more lunches out of 3 heads of romaine leaves, I put in the extra work now.  I cut off the bottoms of the heads, because this method really only works well for the leafy green parts, plus we’re not big fans of the bitter bases.  I then cut up the leaves, which also gave me a chance to sift through the lettuce to dispose of any areas that were browning or wilted.

Chop it up

Chop it up

Next, give it a really good rinse.  I used to rinse first, but then I found myself washing it all again once it was cut, because chopping exposed the rest of the lettuce to the hidden yucky spots that I throw out.  Save yourself the work and water – rinse after you’ve cut it all up.  By the way, that’s one head of romaine in the picture.  Once it’s all clean you need to get it as dry as possible.  This is a seriously important stage.  I’ve learned that the more dry the greens are, the longer they last with this method.  If you have one on hand, I recommend using a spinner.  I then empty the spinner onto a towel and dry the lettuce with a few healthy pats (and shakes, rolls, and pretty much anything else I can manage lol).

Dry the greens

Dry the greens

Once your greens are as dry as you can get them (some days I really suck at it, so don’t beat yourself up if it takes you a bit to get them good and dry), put them in a plastic zipper bag.  Now, I’ve ventured away from the original instructions here just a little, because I’ve found that I can get a couple more days out of my greens if I add some paper towels to my bag.  I use the select a size variety (not on purpose – I need to pay more attention when I buy bulk packages – but for this the smaller sized towels work perfectly), and have put single towels in all different locations.  All that matters is that most of the lettuce has some paper towel nearby, since it will lose some moisture while hanging out in the bag, no matter how well you dried it.  (Two set ups that work great: one towel on the bottom of the bag and one at the top & one towel down each side.)  Also, trust me, don’t use the kind with the little white doodad that slides the bag closed.  Go for the plain old zip it together with your fingers until the blue line turns purple to show it’s sealed, because now you need to blow into the bag.  I found it’s a lot easier if you zip up all but about half an inch at an edge and then blow the bag up.  You want to fill it as much as possible and keep blowing into it as you zip, or else some might escape, and your greens won’t stay fresh as long.  I’ve been experimenting with this method for almost two months, so just trust me.  *grin*  That little tip about the white zip thing was learned the hard way, by the way.  It’s disturbingly easy to get a bit of your lip caught under that thing and end up with a bloody lip.  *rolling eyes*  So far I’ve never popped a bag thankfully, but you want to make sure the bag is full of air, like this.

Fill 'er up

Fill ‘er up

You might have the same problem that I do, too.  The towels like to move all around on me and one ended up moving to the top while one is on the side.  lol Don’t worry about it.  After about three days the towels will be damp, so change them out every so often.  This bag will make a week’s worth of lunches and I’ll change the towels once.  The best part is that the lettuce will look just as crisp and green in the last bowl as it does right now. 


According to the website you can do this method with any leafy green and it’ll keep them fresh longer.  I haven’t tried it on other greens or herbs, just romaine and iceberg.  The key thing is that it has to be a leafy green.  It doesn’t work for other stuff, like iceberg lettuce.  There isn’t enough green to it for the method to actually work.  If you try others, please post in the comments.  I’ll update my pin and the post with your experience(s). 


I hope you have a happy weekend!


Â