Monthly Archives: January 2018
H P Mallory
My mind right now is much like going down the rabbit hole, so prepare yourself for a week of wildly unrelated subjects, until I get a little more used to my new meds. Consider yourself warned and hopefully you enjoy the ride. *laugh*
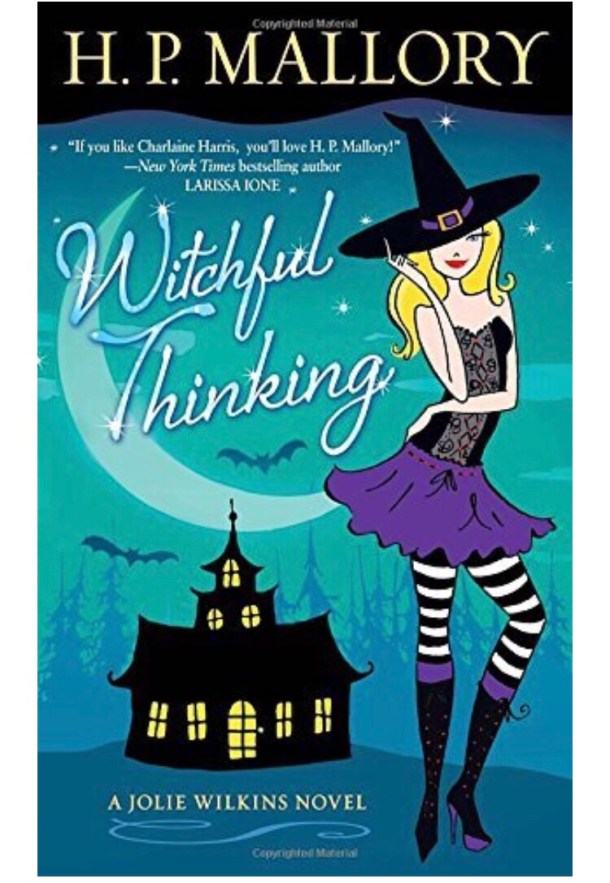
I’d like to introduce you to an awesome author today that has some really fun books in a couple genres, but is legitimately an awesome person from all of the interviews and blurbs I’ve read. I’ve followed her writing for years, since her stories are less predictable for me, and her price point has always been so affordable. To top it all off, she’s a self published author (or started out that way. I stopped stalking interviews and went for the books after I got addicted. Lol). I have massive respect for indie authors and try to support them when I can.
Now, her stuff is a little steamier than I would normally discuss or promote on here, but I’ll stick to the innocent stuff and let you take a look here on your own to see if you might be interested. (If you know paranormal romance and a little cursing just isn’t your thing, please skip the rest of today’s post.) I’ll start with pics for some of the first books in her series (I checked – that’s how the dictionary said to put the plural, so it’s not my fault it looks weird when I’m talking about three different sets of books!).


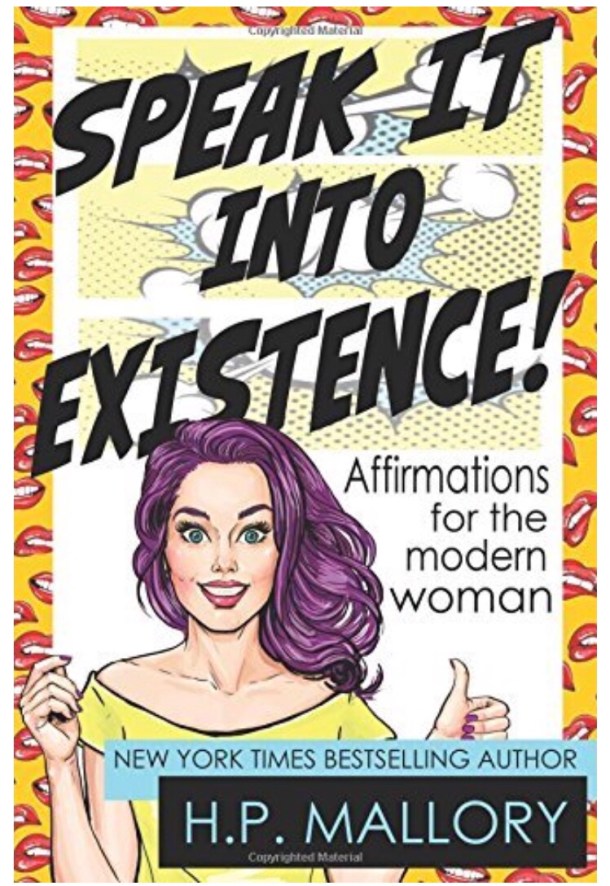
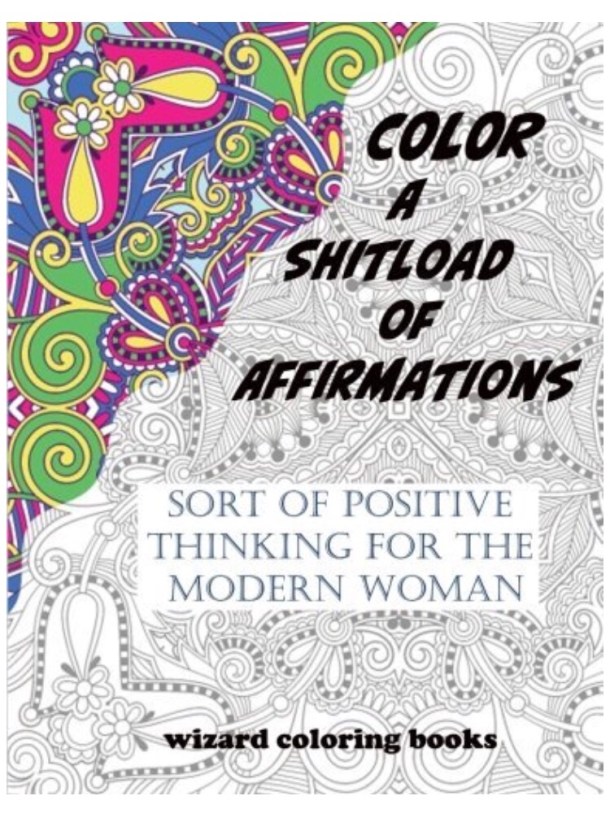
When I was notified that she has branched into two sassy affirmation books, I hurried to order and support her. Now, these are definitely sassy, so if a bit of cursing or eye candy bothers you, don’t click the link. *laugh* One is an adult coloring book with an affirmation on each page. I actually use the coloring as therapy to help with getting better control of my tremor and grip, plus the humor and coloring is great for stress relief. The second has some of the same affirmations, but have a different pairing with the affirmation. Here is the description with kind of a nicer take on curse words…
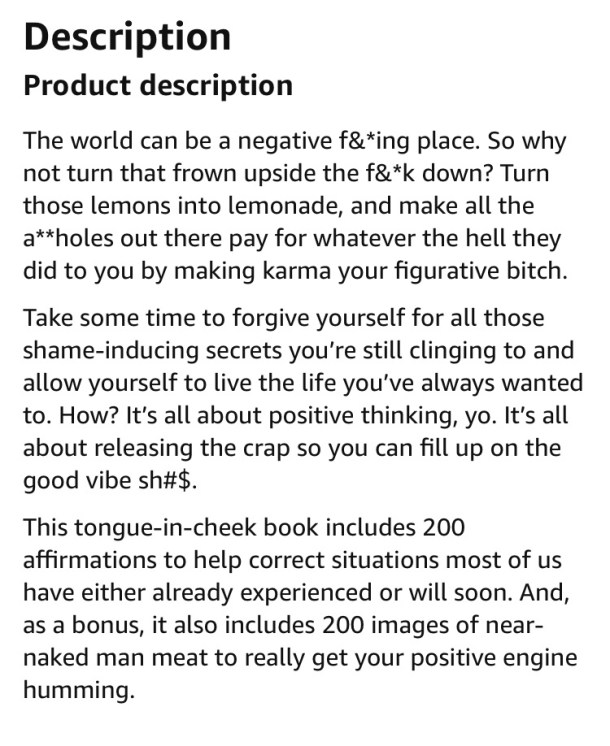
So, if you’re a bit sassy and could use some affirmations, but need humor or coloring to help you remember to read some, check out Speak It Into Existence and we’ll just call the other Affirmations for linking purposes. Lol
You’ll get gems like:
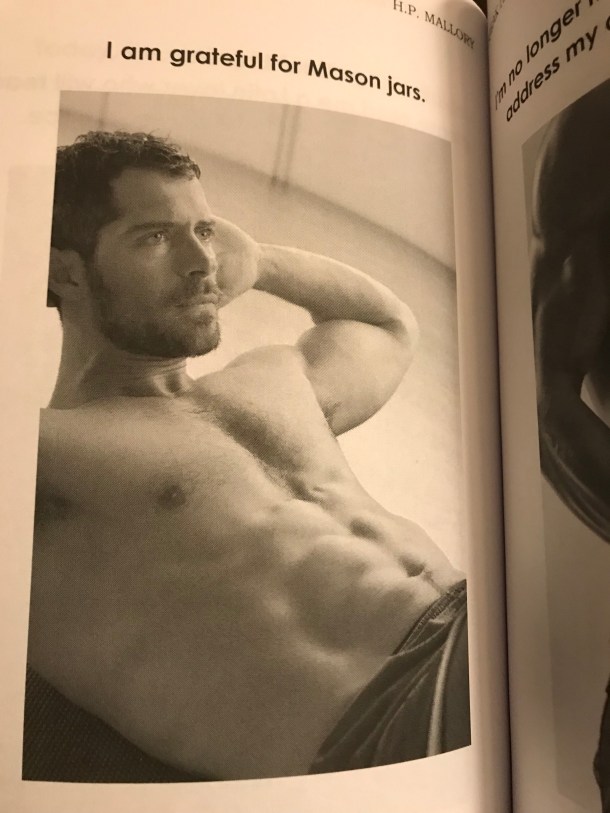
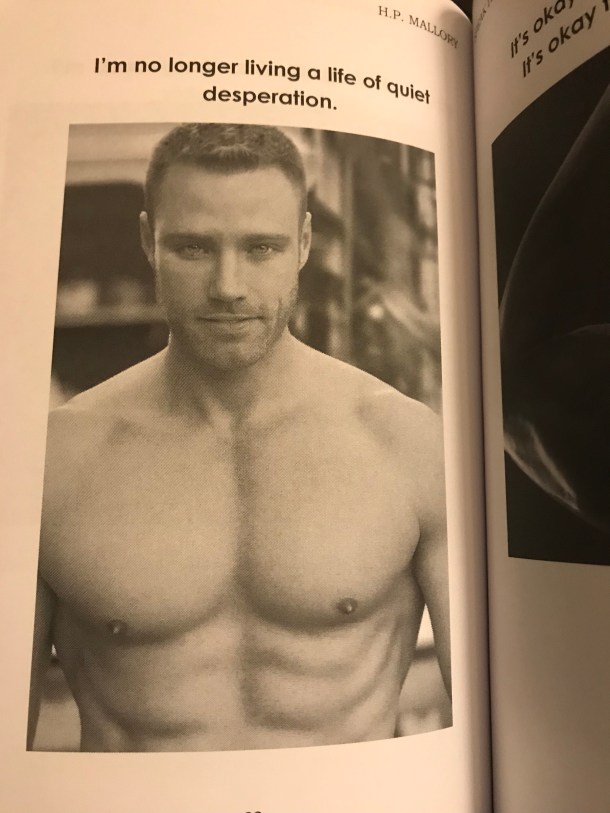
Originally I truly did get these two books to be supportive, but they really make me laugh, so I wanted to share despite the risqué content and wording. If you’re a Charlaine Harris fan, I think you’ll definitely love the e-books and you’ll probably find some laughs with the paperback affirmations. If you’d like to read more about Ms. Mallory, please check out her website. She runs some great sales and some are even in the Kindle Unlimited program if you subscribe (if you read a lot, it is SO worth the subscription!!).
Anyway, I’m sorry if any of this was a little too taboo for any followers, but think she deserves a big kudos for really bringing indie authorship into the limelight and I also think that sometimes we just need something funny to help get us over the bad days. 🙂
Wickedly Yummy!
I’m a little out of it from adjusting to my new medications, but one stops my chronic nausea and vomiting, so I’ve had a pleasant day of napping and eating. *laugh* I had ordered some things through Amazon PrimePantry recently to try to tempt my appetite, while having my problems, and now I’m like Taz from the cartoons, but tearing through our pantry instead. And I discovered that some of those temptation foods are incredible when your stomach feels normal! However, I feel it is my duty to share one that I am quickly becoming obsessed with that is going to add a whole extra round of working out in a few days.
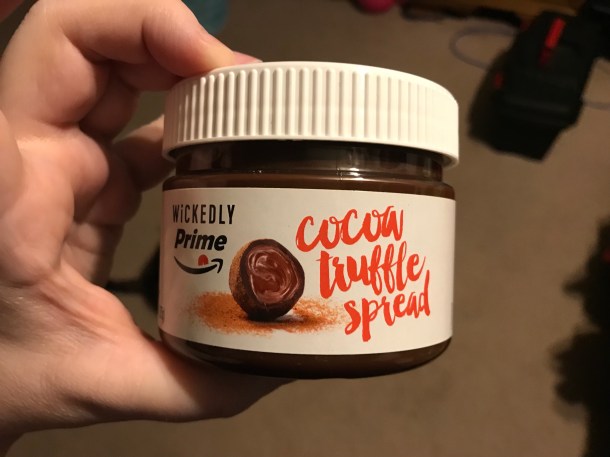
If you are an Amazon member and a chocoholic, then you MUST try this! If you don’t like doing a pantry box, you can buy a two pack through basic prime, too. 😉 Seriously though, you can spread on fruit or even just eat it out of the jar with a spoon in a dark corner like the little chocoholic that doesn’t want to be discovered attacking a food. That might just be something that only I do, though. Lol So, if you have a membership or needed just one more benefit to help you decide if the membership fee is worth it, this only available on Prime ambrosia should tip the scales and you must try this. Seriously, it’s worth the calories and doesn’t get refrigerated, so you can sneak a silky smooth spoonful any.time.you.want. It’s good enough I used popular culture’s period between words concept and you know how snobby I can be about punctuation. *laugh* Have a wonderful rest of your day or evening! I’ll be nestled in my corner of the couch with my jar of spread until my sedative kicks in. Leave the spoon there please if I fall asleep with it in my mouth. 😉
Short and Helpful
Today has been filled with medical stuff, so I wasn’t able to write and schedule the morning post as I have been. Since it’s a rough evening for me and two new sedatives are about to knock me out, I thought I’d make this is short, but wanted to provide some helpful info.
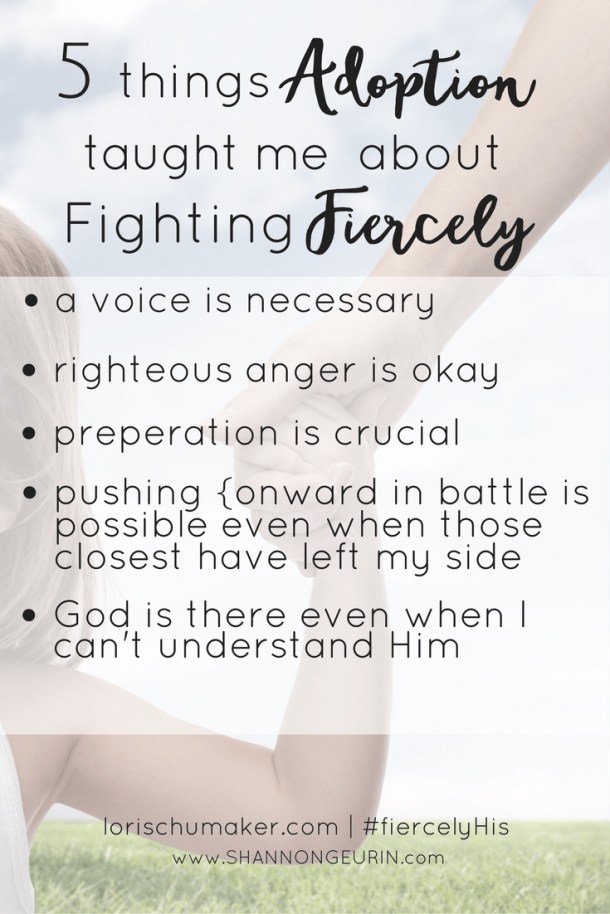
While doing research and prep for any emotional issues our adopted daughter may have I found tons of great worksheets on the internet and Pinterest. Some are even provided by social workers for this. Since it’s been a bit difficult to keep waiting on the adoption to progress when I’m an impatient person *grin*, plus the new health issues that cropped up that we’re trying to pin down, I decided to try a few of the forms and see if they truly are helpful. I swear to you that it really helped me put things into a more positive light, not be so judgmental of myself, and actually took a lot of the stress away once I looked at things differently. If you’re unable to save and print out the pics of the forms from my post, hit my Pinterest board for Teenage Adoption for access to the originals. I do not take credit for these, didn’t create them, and am not totally sure who even came up with a bunch of the others that I’m not including on here. I actually just wrote my responses in a lined notebook and did different topics, so I could use the same original, so no completed worksheets for you to peek at. *teasing smile* Anyway, I hope you consider trying at least one out when things get overwhelming or emotional. Tomorrow I’ll try to have a clearer-minded post for you!! Lol
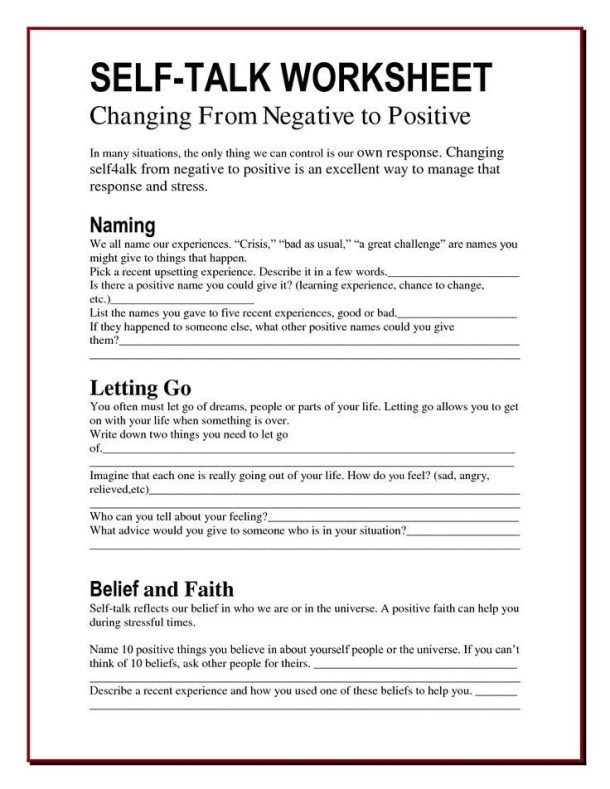
(The Self-Talk is my favorite one)
Boxing
I took up boxing shortly after I moved back home following my escape from an abusive relationship. I’m one of those people who handles things by finding ways to be in control of at least part of whatever is wrong. I hated feeling vulnerable, watching over my shoulder, and wondering if the next time he found me would he finish the job (he did a bit of stalking after I escaped, so it has been a legitimate fear for years)? So I found emotional strength and control by making myself physically stronger and prepared. Although I thankfully haven’t caught sight of him wherever I’ve gone or been for around ten years now, I still find inner peace with boxing.
My canvas punching bag accidentally got wet and basically turned into cement, so I gave boxing up for several years. Two years ago my husband bought a strike shield, but was unavailable to hold it when I got the urge to box, so we hung it on our bedroom door. When I closed the door it would hold the pad in place. However…it sounded like I was breaking the door! Needless to say, I went back to Wii boxing, but the satisfaction just isn’t there when there’s no impact. *laugh*
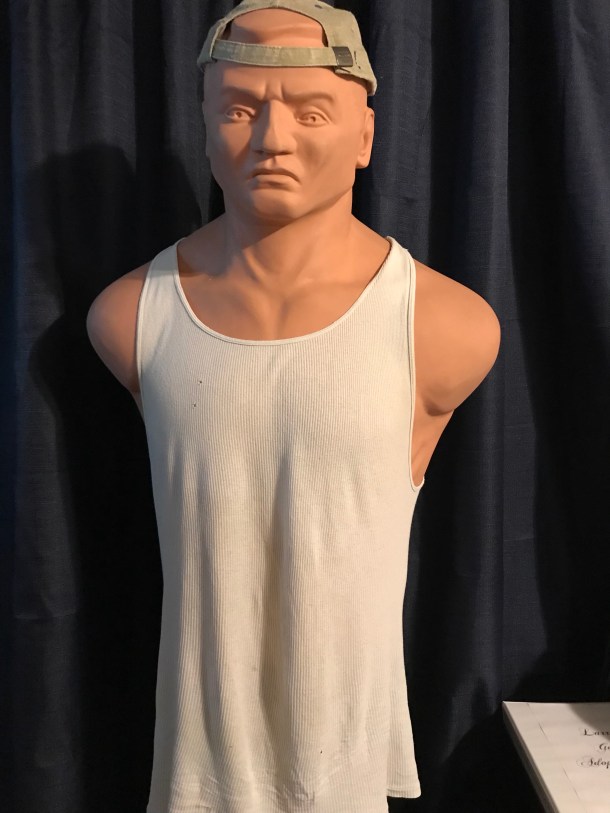
As an early joint Christmas gift we bought one of the BOB stands (Body Opponent Bag), which was a display and a price match, so we got three discounts on it, making it one of the most guiltless workout pieces we have ever bought. *grin* Until we get our spare room situated he hangs out in our living room. I’m going to put some “ink” on him once I make up my mind on what scars and tattoos I want in him, but in the meantime we made him into white thrash. I named him Eddie (there are just too many impolite things BOB can stand for, so I couldn’t do it lol). The name is a play on part of my ex’s name, but we don’t have to actually soil our home or conversation with his real name. I really wouldn’t want to say the bastard’s name all of the time, honestly, and especially not have my husband say the name often (excuse my language). The name comes up enough when we work through my trauma, so I decided a play on it would help. And it makes boxing doubly satisfying and therapeutic.
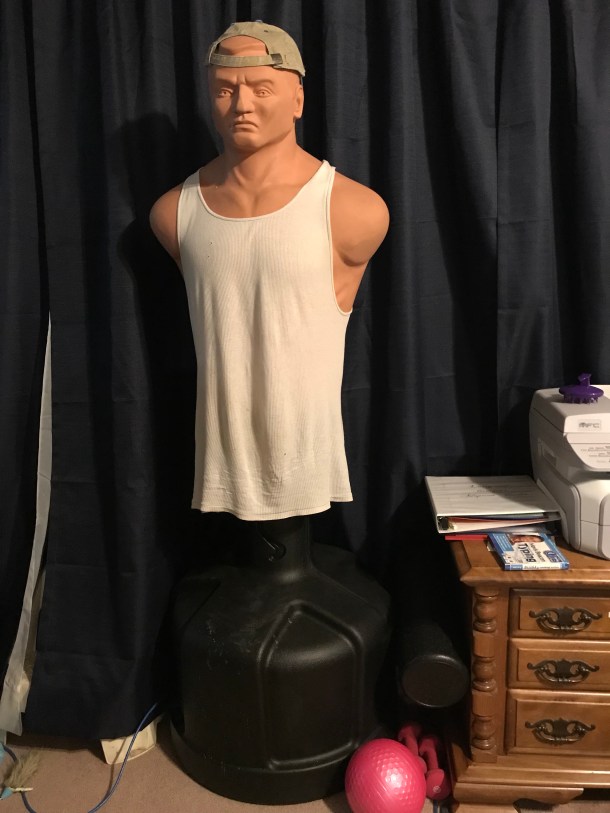
L poured 350 pounds of sand into the base to keep it in place, which is the max. Recently we discovered that if I’m upset about anything I am actually able to hit hard enough that I moved Eddie all the way until the base was stopped by the wall. Needless to say I was impressed! I truly didn’t think I had that in me. The flattened ring pattern on the carpet from where the base used to sit is like a badge of honor, so I haven’t tried to lift the pile there yet. *laugh*
If you’re like me and need some physical release, but can’t do much exercising, and especially if you’re dealing with the lifelong effects of abuse, try out boxing. It’s great for helping you get into working out, you totally lose the dreaded “droopy chicken wings” on the underside of the arms, and it may just help you become a little more emotionally fit, as well. After lots of broken and bleeding knuckles, I caution you against ever using tapes or training gloves on canvas bags or BOBs. I just wanted to throw that out there in case you’re interested in picking this up. It’s worth spending more for the pro gloves, trust me! If you would like more information or tips, don’t hesitate to contact me. I’m totally not professionally trained, but I love it and have learned a lot along the way, so I’d be happy to share what I’ve learned.
So this is one of the Habits I established for myself for this year (see my resolutions post for an explanation if you’re lost). It’s a three-win for me. Have you started or plan to start a new habit for the year? If you need someone to encourage you while you make it into a habit, I’m happy to help! After boxing, don’t forget to do a little pampering, of course! 😉
I Picked New Habits
Instead of picking resolutions for this year, I decided to develop new habits. I’ll share a few later on, but for now I’d like to share this incredible post that was sent to me. I think it’s a much healthier perspective and will definitely help me for a lot longer than any resolution. Hopefully it may help a few of you as well.
Please read Miss Mustard Seed’s Nurturing Habits. Once I’ve healed from my recent falls I plan to be less inspirational and write more of my long-winded random posts, I promise (or threaten, if you prefer the usual randomness *teasing grin*). Until then, I wish you success developing your new habits for this year!!
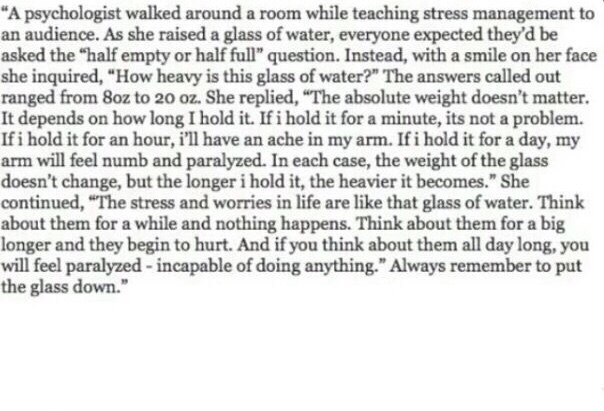
Something To Think About
Today the post is going to be short, because I want to share a quoted lecture that I was sent, and it was very profound. It is truly changing how I handle some of my fears and thoughts. I hope it helps at least a few of you, dear readers, and helps you start this year with a much better way of handling what life throws at us. The picture’s print is small, so be prepared to enlarge your screen. I’m sorry about that!
A Little More Behind the Scenes
I thought I’d continue pulling back the curtain on prepping to make products and my processes. This won’t be nearly as detailed, but rounds out the view.
Storage and organization of the products has been a really difficult thing for me to manage since we have a cozy sized home and the only space we could dedicate was the space for a shelving unit. It’s a blessing now, because it helps keep me from having too much on hand that can go bad before anyone ever wants a product that uses those ingredients. I’ve lost a lot of money on expired ingredients and it was a hard lesson, and taught me to budget for my creative endeavors a lot better. Now that I am getting help on occasion and may utilize product creation as a bonding and learning opportunity with Kiddo once we have placement, I decided that I really wanted to make things easier for locating ingredients. (If I’m being completely honest, I’m also thoroughly delighted with my label maker and it is soooo satisfying for me to label where things are! Yeah, I know how weird that is. *laugh* I figure it’s in the same part of my brain as my love of spreadsheets. *grin*)


Each shelf has a general theme and then, as you can tell by the labels in the right picture, there are sections for specific items. My containers are either stored and labeled in that little black stand in front of the shelving unit or in shoebox totes on the upper shelf of the curtained area. The bottom is kind of my overflow area, especially since containers are much cheaper when purchased in bulk, but take up so much room, and I also put a lot of my creation tools, like pots, the scale, and cutting boards, down there because it’s easier for me to reach than that top shelf. *laugh* Sometimes, due to my balance issues from my illness, my doctor(s) advise me to not climb, so I’m not always allowed to bring a chair or my ladder over. So about a month ago I got smart and moved some of those things down. *grin* And then my four shelves have a curtain to close them off to the rest of the kitchen, minimize any possible dust contamination to things like pipettes, and it’s another one of my “feels like I’m organized then” things. lol
The night I took pictures of my creation process I also took a few of prepping for experimenting on making some soaps. The left side shows preparing to handle the base and mix the scent with stabilizer (I bought a cheap set of butter knives to dedicate to this, since I found they work the best in those tiny cups and can actually get into the edges to guarantee that there aren’t oils hiding unincorporated). I honestly have so much to wash and disinfect anyway that I try to reduce needing to wash equipment when possible, so I use a lot of wax paper. *laugh* I can toss it out once I’m done or if it becomes contaminated and it saves me one of my few energy “spoons”. My plastic gloves are right beside the cutting board and then I put the rest of the box in an open gallon bag tacked to the other side of the half wall beside that counter, so I can grab another set quickly and easily if needed.
To the right are some of the molds I was considering to use in those formulas, plus my box of wax paper sheets and trusty bottle of alcohol. The microwave is above where the picture cuts off, so I can heat the base, add and adjust coloring, and then add the scent (or blend, herbs, etc.), and pour right into a mold, so the soaps don’t develop issues. If it cools too much then you can get a funky chunky look to the bottom of the soap, kind of like when you are frosting a cupcake and don’t get that nice little twist end, but instead end up with a blob of frosting at the tip. Also, if I move a mold when the soap is even barely cooling you’ll see a wrinkled appearance to the bottom of the soap (the exposed area when in the mold). There are a bunch of other possibilities for epic failures in this stage, but you get the drift, so I try to keep things easily accessible. Once the soaps are in the mold and they’ve cooled for a few minutes I cover the soaps with wax paper to prevent any contamination or air particles/dust settling while they set.


That night/early morning was when I changed my mind on Grandma’s Pie, so I swapped out the pie slice mold for another spoon mold. They’re by two different companies with different depths and different levels of success. *laugh* I really would like to do a “Spoonies” soap to offer and to even be able to successfully make to give to people I meet that are newly diagnosed along with the printout of the Spoon Theory. I’m not happy with either version, which is in the following picture, so I’ll end up reworking the formula and playing with how much I fill the mold I like.


As you can tell the two molds are incredibly different. The brown one makes the really deep and short spoons in the foreground in the right picture. The purple one is so shallow that the soaps resemble bubble blowing wands despite filling the cavities to the brim. You can see the best shallow soap behind that thick soap. Just look for the hole in the middle where it’s a lovely wax white shade. *grin* The only way I can make the shallow mold work would be to pretty much pour until the whole top of the mold becomes solid and then I have to cut each spoon out of the blob. Um, Xacto knife cutting is okay for tiny detail work, but I really doubt I could safely cut a whole mold full of soaps neatly. Okay, I even doubt I could neatly cut those soaps at all. *laugh* I’m realistic. As you can see with the thick soaps they’re so thick they don’t really look like spoons, so I’m going to see if maybe a half deep pour, instead of filling the cavities fully, will be better. I wish the color came through better, but hopefully it will if I can get these worked out and then do a photo box photo shoot of them. They are an eggplant shade with the gorgeous shimmer from the mica. *happy sigh* They are gorgeous.
Since I all ready shared about my labeling addiction, I’ll close with a confession. I’ve labeled almost every single cabinet and shelf throughout the kitchen and laundry room, plus every fabric box that holds my crafting supplies, and even on pet items like brushes that are used on Teddy only. If your resolution is to get more organized, send me a note and I’ll help direct you to my favorite items. 😉
One Soap Formulation Description
I thought today I’d give you a little more of a behind the scenes look at my process for a type of soap creation and also describe how I go about creating my formulas for products.
I seldom ever use formulas (recipes) created by others for my products, except every so often ones written by the professional soap crafter that created the wholesale supply company that I use. It kind of ruins the creative and fun side of crafting for me. Sometimes the epic failures are a bit overwhelming and discouraging, but most of the time that problem solving aspect spurs me on to keep going. Probably remnants of my days as a Medical Billing Clerk and Coder, plus the HIPAA Clerk responsible for Risk Analysis. Or maybe it goes all the way back to my love of Nancy Drew books. *laugh* Any which way, I love the research behind creating a new formula and all of that tedious stuff that most customers never get to see.

Here I am at about 3 AM a week ago after getting all of the ingredients and tools ready, having finished my research, and written up the starting formulas for the Spoonie soaps and the Maple Bacon squares that I was considering making into embeds for the previously mentioned Grandma’s Roadkill Pie. At the furthest back of the table is the window and wildly messy bed that one of my cats insisted on making look as bad as possible right before I took the picture. Since I had just disinfected, I wasn’t about to touch his stuff. *laugh* In front of that, on the right side, is all of the safety equipment, while my ingredient research book is on the left side. From those items to me are the ingredients for my mad scientist moments. *grin* There is vanilla stabilizer, to help keep the soaps from turning brown due to vanilla content, mica powders for coloring the soap, some color soap bars as a backup if the mica didn’t work to my satisfaction, and then the FOs I was planning on using.
When I create a formula (after talking so much with the case worker for the adoption it came to my attention that really I’m performing chemistry and making math equations, and not really recipes, so I decided to go with the name for consistency sake), I start out writing down the basic ingredients that I plan to use. So I start with how much soap base I want to work with or believe the mold may hold (that’s a fun guessing game some days *rolling eyes*; I really need to go through and just fill with water, and then make a list of each mold’s capacity, but that’d make things too easy). I then write down which scent(s) I am using with a space for writing in the amount of FO I end up using, plus I look up and write down the government’s allowable amount of the ingredient in the base, and then I follow the same steps when I write down the stabilizer if applicable and what type of colorant I will be using. There are a lot of scents that would be too overpowering if I used the maximum allowable, so I always write that in as I am in the creation process. I’m not sure how they come up with a maximum allowable amount for a base, but the government has a percentage allowance for each ingredient dependent on what you’re using it in, and then I refer to a cheat sheet percentage conversion chart that lists 3% of 8 Oz equals 7 ML allowed, etc. I also have a secondary conversion of ML to teaspoons for the micas and such. Did I mention that periodically they love to change those allowables and so I have to go back through previously made formulas to check if they’re within the new allowable. Sometimes I’m creating products when I really shouldn’t be because my hamster wheels aren’t quite running right in my brain and I forget to write down what mold I’m using or how many mold cavities my new formula holds. Those can be interesting to run across when I sit down to type up everything in my computer. *grin*
Next I move on to laying out the molds and setting up all of the tools in the areas I will use them, plus getting my trusty scale out to make sure I’m going by weight instead of volume, which I learned to do after my first year of creating products and running into a problem with figuring pricing due to volume since those weight to volume conversions don’t usually work out right. *laugh* If I am using a scent that requires stabilizer I need to pipe in the amount of scent I want to start with and then mix in an equal amount of the stabilizer, and then thoroughly mix and let sit for at least five minutes, but no longer than fifteen, so I have a maximum of fifteen minutes for finishing prep and getting to the scenting stage when I make soap. Thankfully it’s not an issue I deal with in any other product (mostly because scrub is all ready a mucked up color and bubble washes are used up way before a color change could ever take place, but soap color changes happen a LOT faster). I mix the FO and stabilizer in these little shot glass sized measuring cups, and yep, it almost always looks like a frothy odd color of urine for some reason. *laugh*

I move on to weighing, cutting, and warming up the soap base (which was previously created in bulk), almost always in the microwave in a business dedicated measuring cup, although I also have a bulk soap heater, which is kind of like a specialty crock pot. I like having more control over each step, and the individuality approach, so I prefer all ingredients for a soap in a single large measuring cup instead. Although there are differing “must follow” instructions for which comes next, I then start adding color after the base has melted, and once the preferred color is reached I add the scent mixture, and stir the tarnation out of the concoction. If the scent doesn’t seem like enough it seriously sucks, because I need to recheck the allowables, add scent into the emptied cup and then blend with stabilizer again, and try to keep the soap warm while waiting for the blending time frame to finish. I honestly seriously suck at this part. I almost always either warm it too much and it boils a bit (which isn’t great for the mixture and it dilutes what scent is all ready mixed in), or I get caught up in another task and the soap sets up partially in the measuring cup and it’s a pain to try to reheat that since it’s not a stage that I can cut up or remove from the cup. I’m learning to quit trying to multitask and just mother hen during the warming process, which totally goes against my grain. *grin* And then I cross my fingers and add the scent blend when it’s time, hoping that it comes out smelling just right. At times the maximum allowable just doesn’t allow for enough scent if it’s a delicate scent or one with mixed notes, while other times some scents just go funky once added to a base. Like I said, it’s basically a chemistry experiment. *smile*
Once it’s as good as it’s going to get I pour into the mold(s) and if I have extra (what I call overpour), I hurriedly grab a random clean mold and pour the extra into that. *laugh* Spritz the top (which is actually the bottom of the soap) with some Isopropyl Alcohol (yep, the stuff you use for antiseptic), which actually causes most, if not all, bubbles to pop and usually the smell fully dissipates. Then I cover with wax paper, since I don’t have a separate building to be doing this and who knows what could get into the air or splatter since it’s a kitchen in a lived-in house! And following that is the dreaded clean up process which is usually killer on my Fibro, since I’ve usually used up all of my energy on the creative part (thankfully I have help sometimes that handles that for me! Bless you guys!). The worst part then follows. Waiting a day or even a few before the product sets up and I can see how it turned out. I am so impatient with creative endeavors, plus the scent tends to fill the house, and if I created several products with varying scents, sometimes we have a headache inducing, nasty blend of smells filling our house. *laugh* Once set it is time for packaging, altering it as needed if being used in other ways, or bagging it up to deal with later if I’m kind of lost creatively at that point. I can’t tell you how many bags of product I’ve had to toss that I just couldn’t figure out what to do with or wouldn’t work in the concept I had originally came up with and can’t come up with an alternative use. People have gotten tired of my giving them these soaps, since there are usually several soaps and don’t get used up fast enough to need more soap dumped on them *grin*, and I’m in a location that isn’t that great for donating. I’ve shipped lots of this soap to emergency areas, but can’t always afford the shipping or run out of room to hold them while waiting for a chance to donate. The efficient and reduce/reuse/recycle side of me goes ape over this, I assure you.
After this I figure up the pricing of the ingredients in the formula (subtracting the amount of overpour when I figure up the pricing, of course), add my 55% labor charge (yep, I don’t do like most people and have a markup of 100 or 200% since I want to keep the price points lower, and just mostly someday make enough money to cover the costs so that I can keep getting to be creative), and add the tax. I hate as a consumer trying to figure up and set aside tax for a purchase, so I decided a long time ago to just add it to the product cost and then I’ll just take the extra tax needed out of my profit, if applicable, or get that tiny extra percentage added for a little more profit that I can turn around and spend on more ingredients. And then quarterly I get to pay my quarterly profit tax or notify them I had no sales for the quarter. So. Much. Red. Tape. Almost every stage has something I need to keep track of or watch for changes. *laugh*
So, in almost full detail, that’s a pretty good look at what goes on for basic mold poured soaps. Manipulated soaps are a lot more complicated and I’ll tell you about that another day, unless someone comments that this was super boring, because I really don’t want to bore you! I really hope that it was kind of neat to know what is going on to deserve that labor mark up. Until tomorrow, have a warm and happy day, and don’t forget to find a few moments to pamper yourself. You always deserve even just a few moments!
Day Two – The Monster Product Line
As you may remember from last year I made some Monster Duck soaps as well as some Zombie Bait brain soaps. A bit gory to some, mostly just funny and interesting to most people, and really interesting to work on creating. While I was quiet on here I thought a lot about those products and about how proud of them I am (yep, I’m mixing tenses, because I’m still incredibly proud of those little beauties and the fun photo shoots!). I came up with several ideas of products to add in the same realm, so I decided to make an actual line for these kinds of products and allow my creativity to have full reign.
A few ideas I had to throw out because they’re were too gross even for my macabre and sarcastic sense of humor, and then a few just weren’t logical enough for me to tolerate. Which seems ironic to most people I tell that to, since it’s all about implausible things anyway. I have no idea why, but some things have to be logical to me. For example, I thought about making “Grandma’s Roadkill Pie” soap slices. At first I thought of just embedding a bunch of different colored soap cubes and chunks of brain soaps, etc., but then I thought about how that would be more like a pot pie for the roadkill embeds to fit in, and all I could picture was how that first crack with your fork of the pot pie always makes the contents pour out almost like a stew inside of a crust. That just did not work for me with having a pie slice mold and I became obsessed with how it wouldn’t be logical for the roadkill to stay in pie form. *cracking up* As a result I went a little further down the rabbit hole and want to try formulating a “Dreadful Delights Cake” instead. It can have things like goblin syrup, eye of bat, rotten pumpkin, and swamp scum in my small bundt cake molds. Just like with a regular cake you have liquids and then your flour gives it a binding, cake-like texture. I don’t have any good excuses for why that is so much more logical and reasonable to me, but my brain works in mysterious ways and that’s where it settled. *grin*
I also came up with some other concepts to play with and hopefully make some successful formulas for. I’d like to do a Vampire-themed soap that’s black and red. I haven’t decided if I want to swirl the colors in guest rounds or if I want to try a new technique I watched a tutorial about where you make a loaf of soap with straws making open holes through the soap that can then be filled by another color of soap and it makes a complete stripe of that color. I could either make it look like bloody veins where a vampire’s fangs had fed, maybe even with those cheesy fake vampire teeth stuck into the soap. Who knows where this concept will take me. *laugh* I also want to actually make a product I thought of ages ago called Vampire Tears, which will be a red bubble wash. I’m debating Vampire Ashes as a name for some bath salts, too, but my mind battles over which genre of vampire lore I’d go with – some depict the ashes as grey ash whereas some (albeit mostly B movies) show it as a reddish substance, which would definitely be more attractive than soaking in grey bath water. *grin* I have the same problem with the name/idea of “Gargoyle Dust” salts due to the whole dirty water look. It might work for a new formulation of the mechanic soap that’s less abrasive. Rotten Sweets will probably be mini bundt cakes in chocolate for the cake and either cherry or strawberry FO drizzled over as blood or some other gore. I think I’ll let the drizzle be an unshaped pour, too, instead of having shaped pooling at the base like I did for the brains and ducks. Partially because shaping hot soap really hurts and I try to limit how often I purposely do stupid things to myself. *laugh*
A few other product names I am playing with and need to develop some product concepts for are “Deathly Morsels”, “Devilish Delights”, “Swamp Ooze” (or Scum) for a bubble wash probably, “Zombie Stout” (a colored bubble wash using the Ale FO and it even calls for using stale beer in it that theoretically has the liquor part burn off during the heating phase – that’ll be an interesting experiment I suspect!), and some version of a Zombie Repellent, although I need a different name for that, since I found an actual soap made by a crafter named that, so I need to play with the name because I’m not giving up on that one because I love the concept. I’m also wondering if a “virus” or “zombie” combo would be of interest to customers. I personally would be incredibly amused to get a basket with that type of theme, but, then again, I’m not the normal kind of girl, as we know. *laugh* I’m also debating if Zombie Boogers bath salts or bubble wash is too gross or just gross enough that it would really appeal to kids, and in honor of the pride of Kansas, I want to make a product named “Melted Witch”. *grin* The great thing with the monster line is that I can have all of these wild things and use any scent that I fancy, instead of actually trying to make a logical connection, like if it’s red people expect a red fruit or a rose scent, etc. Monsters are a free zone of creativity. Mawahahaha
